Putting the Gibson back together

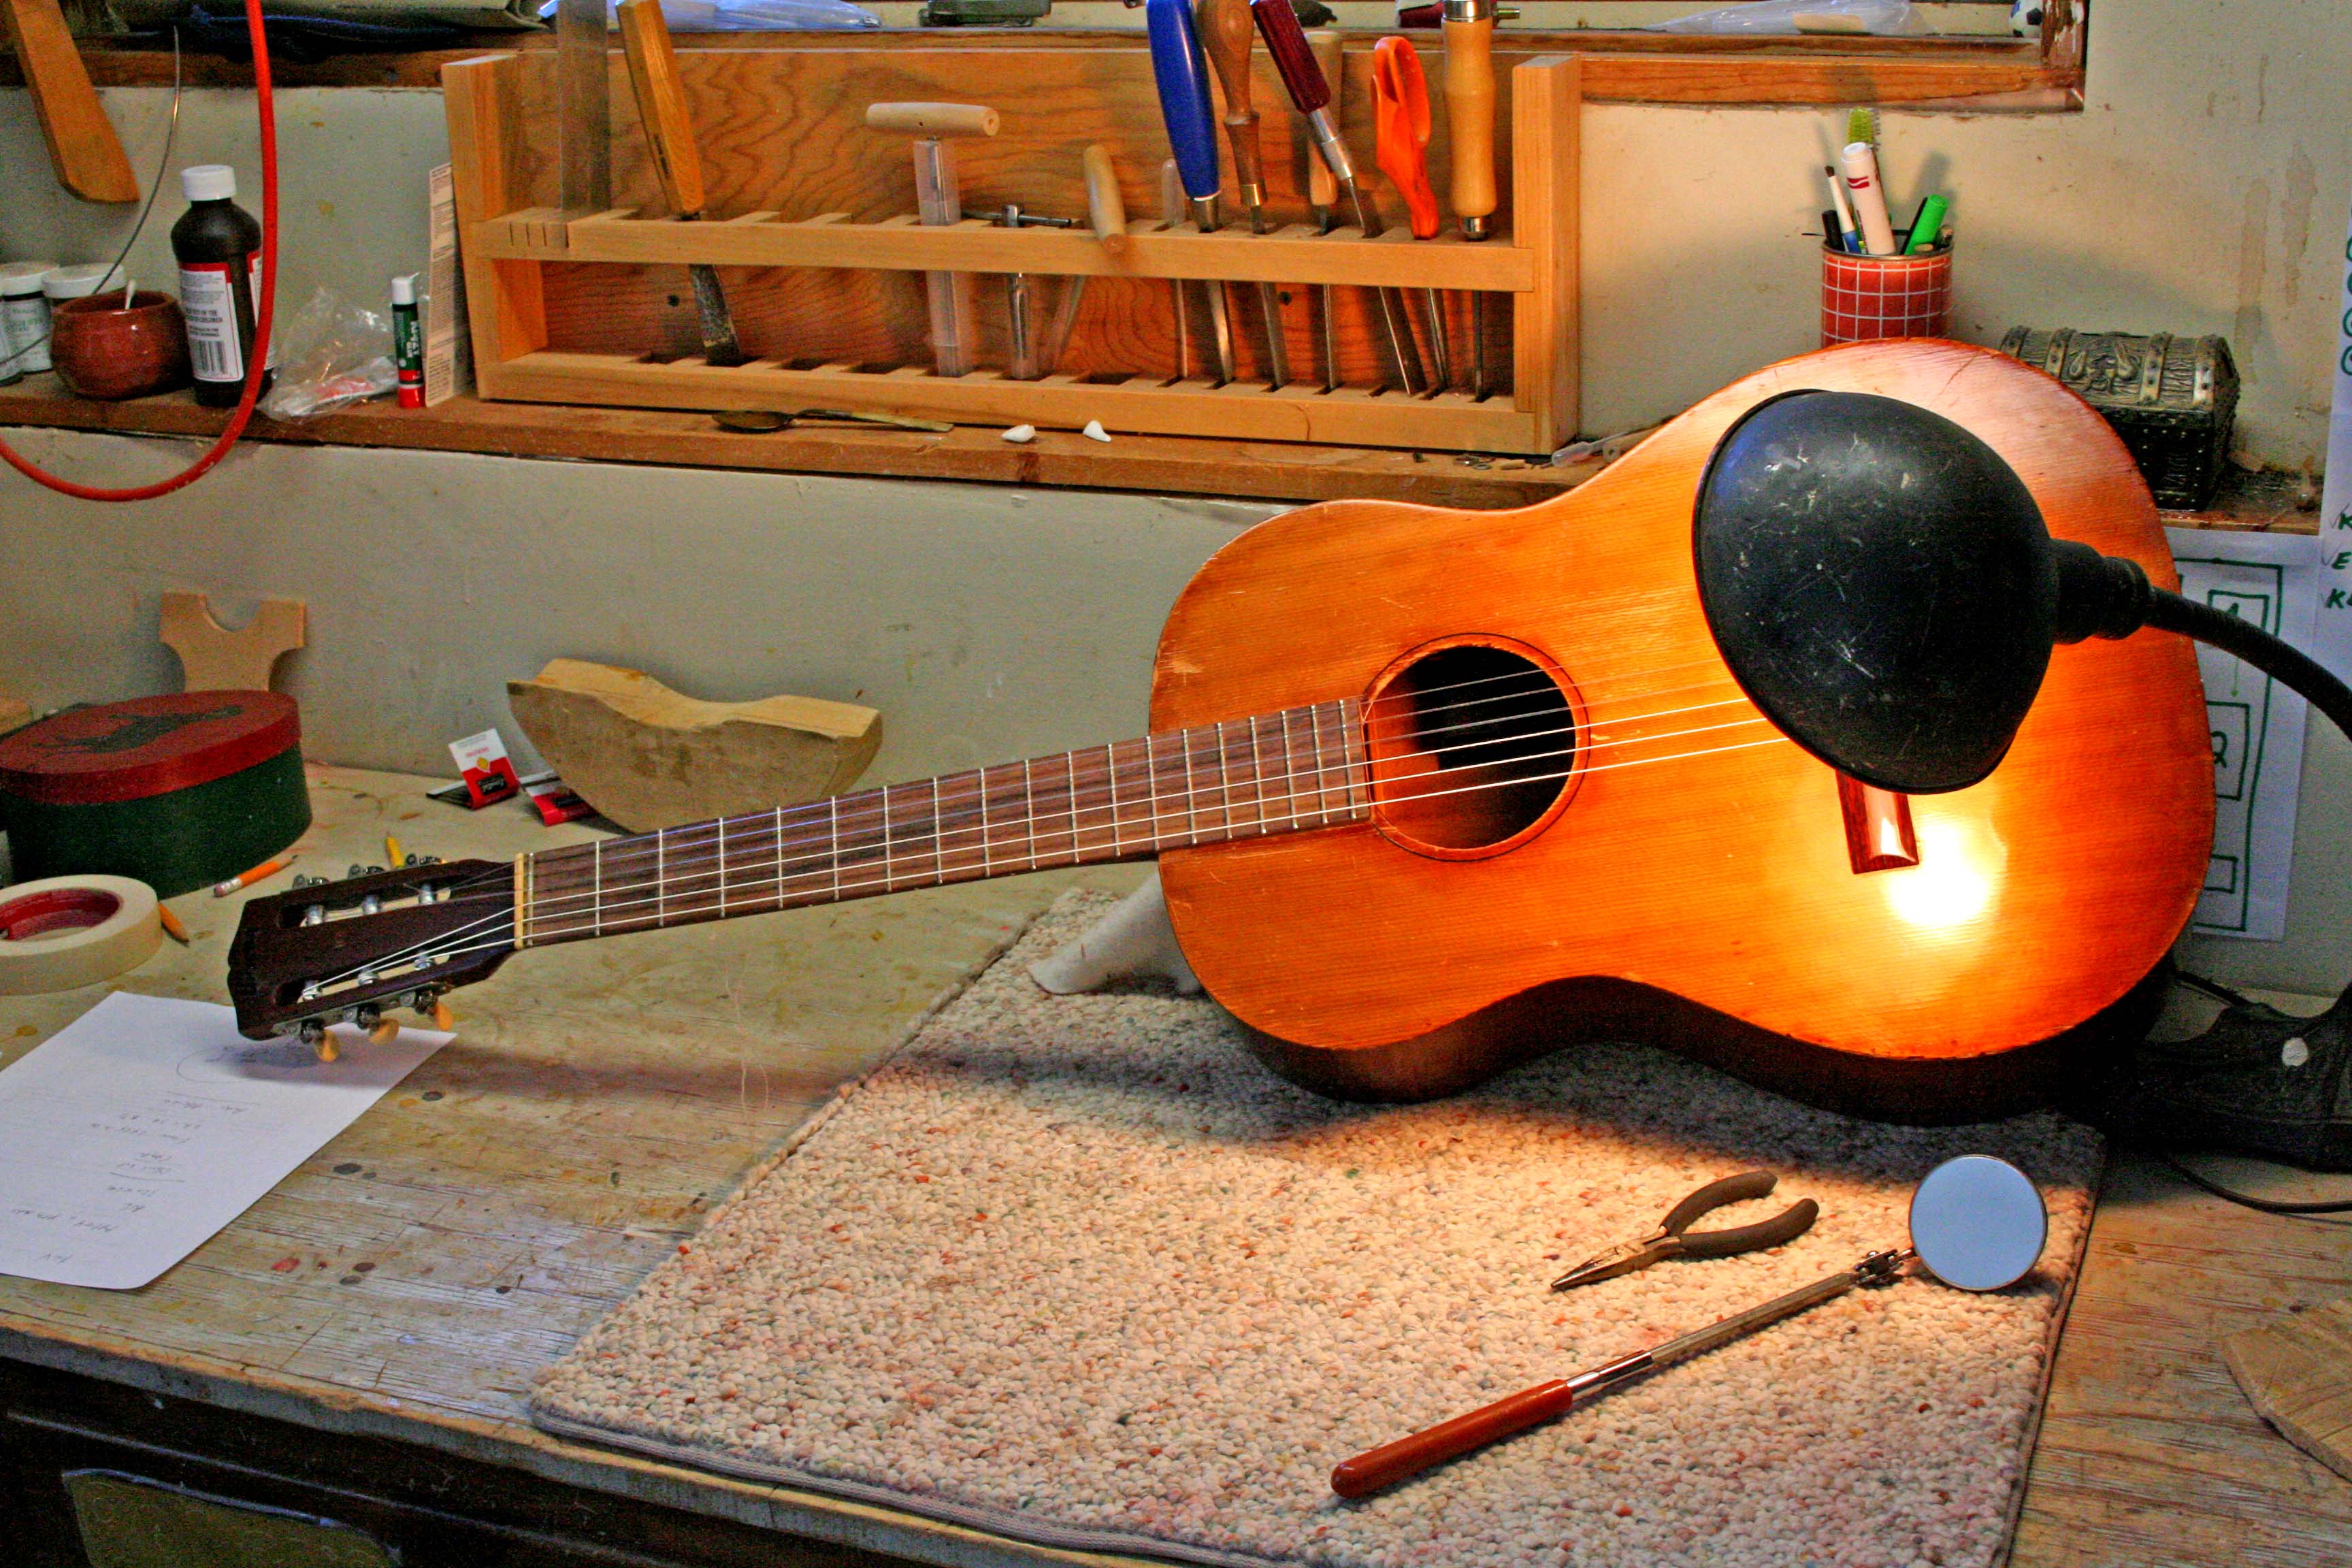
Ok, after that interlude with the game camera, back to business.

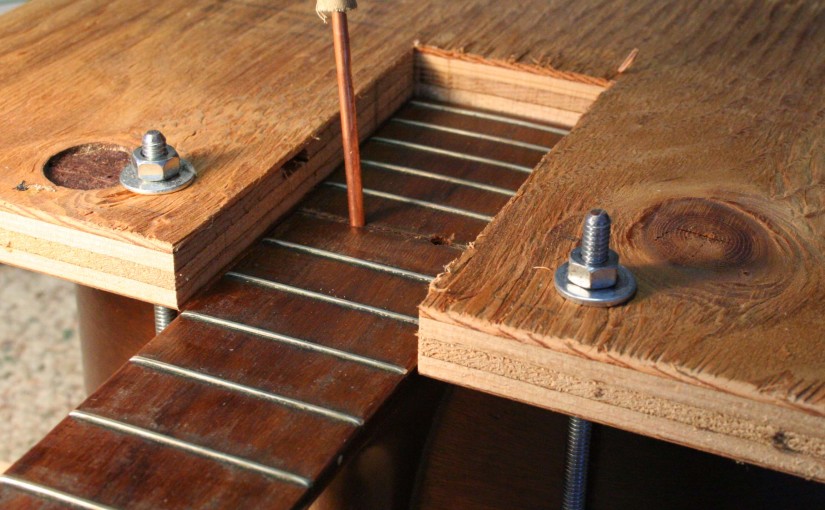
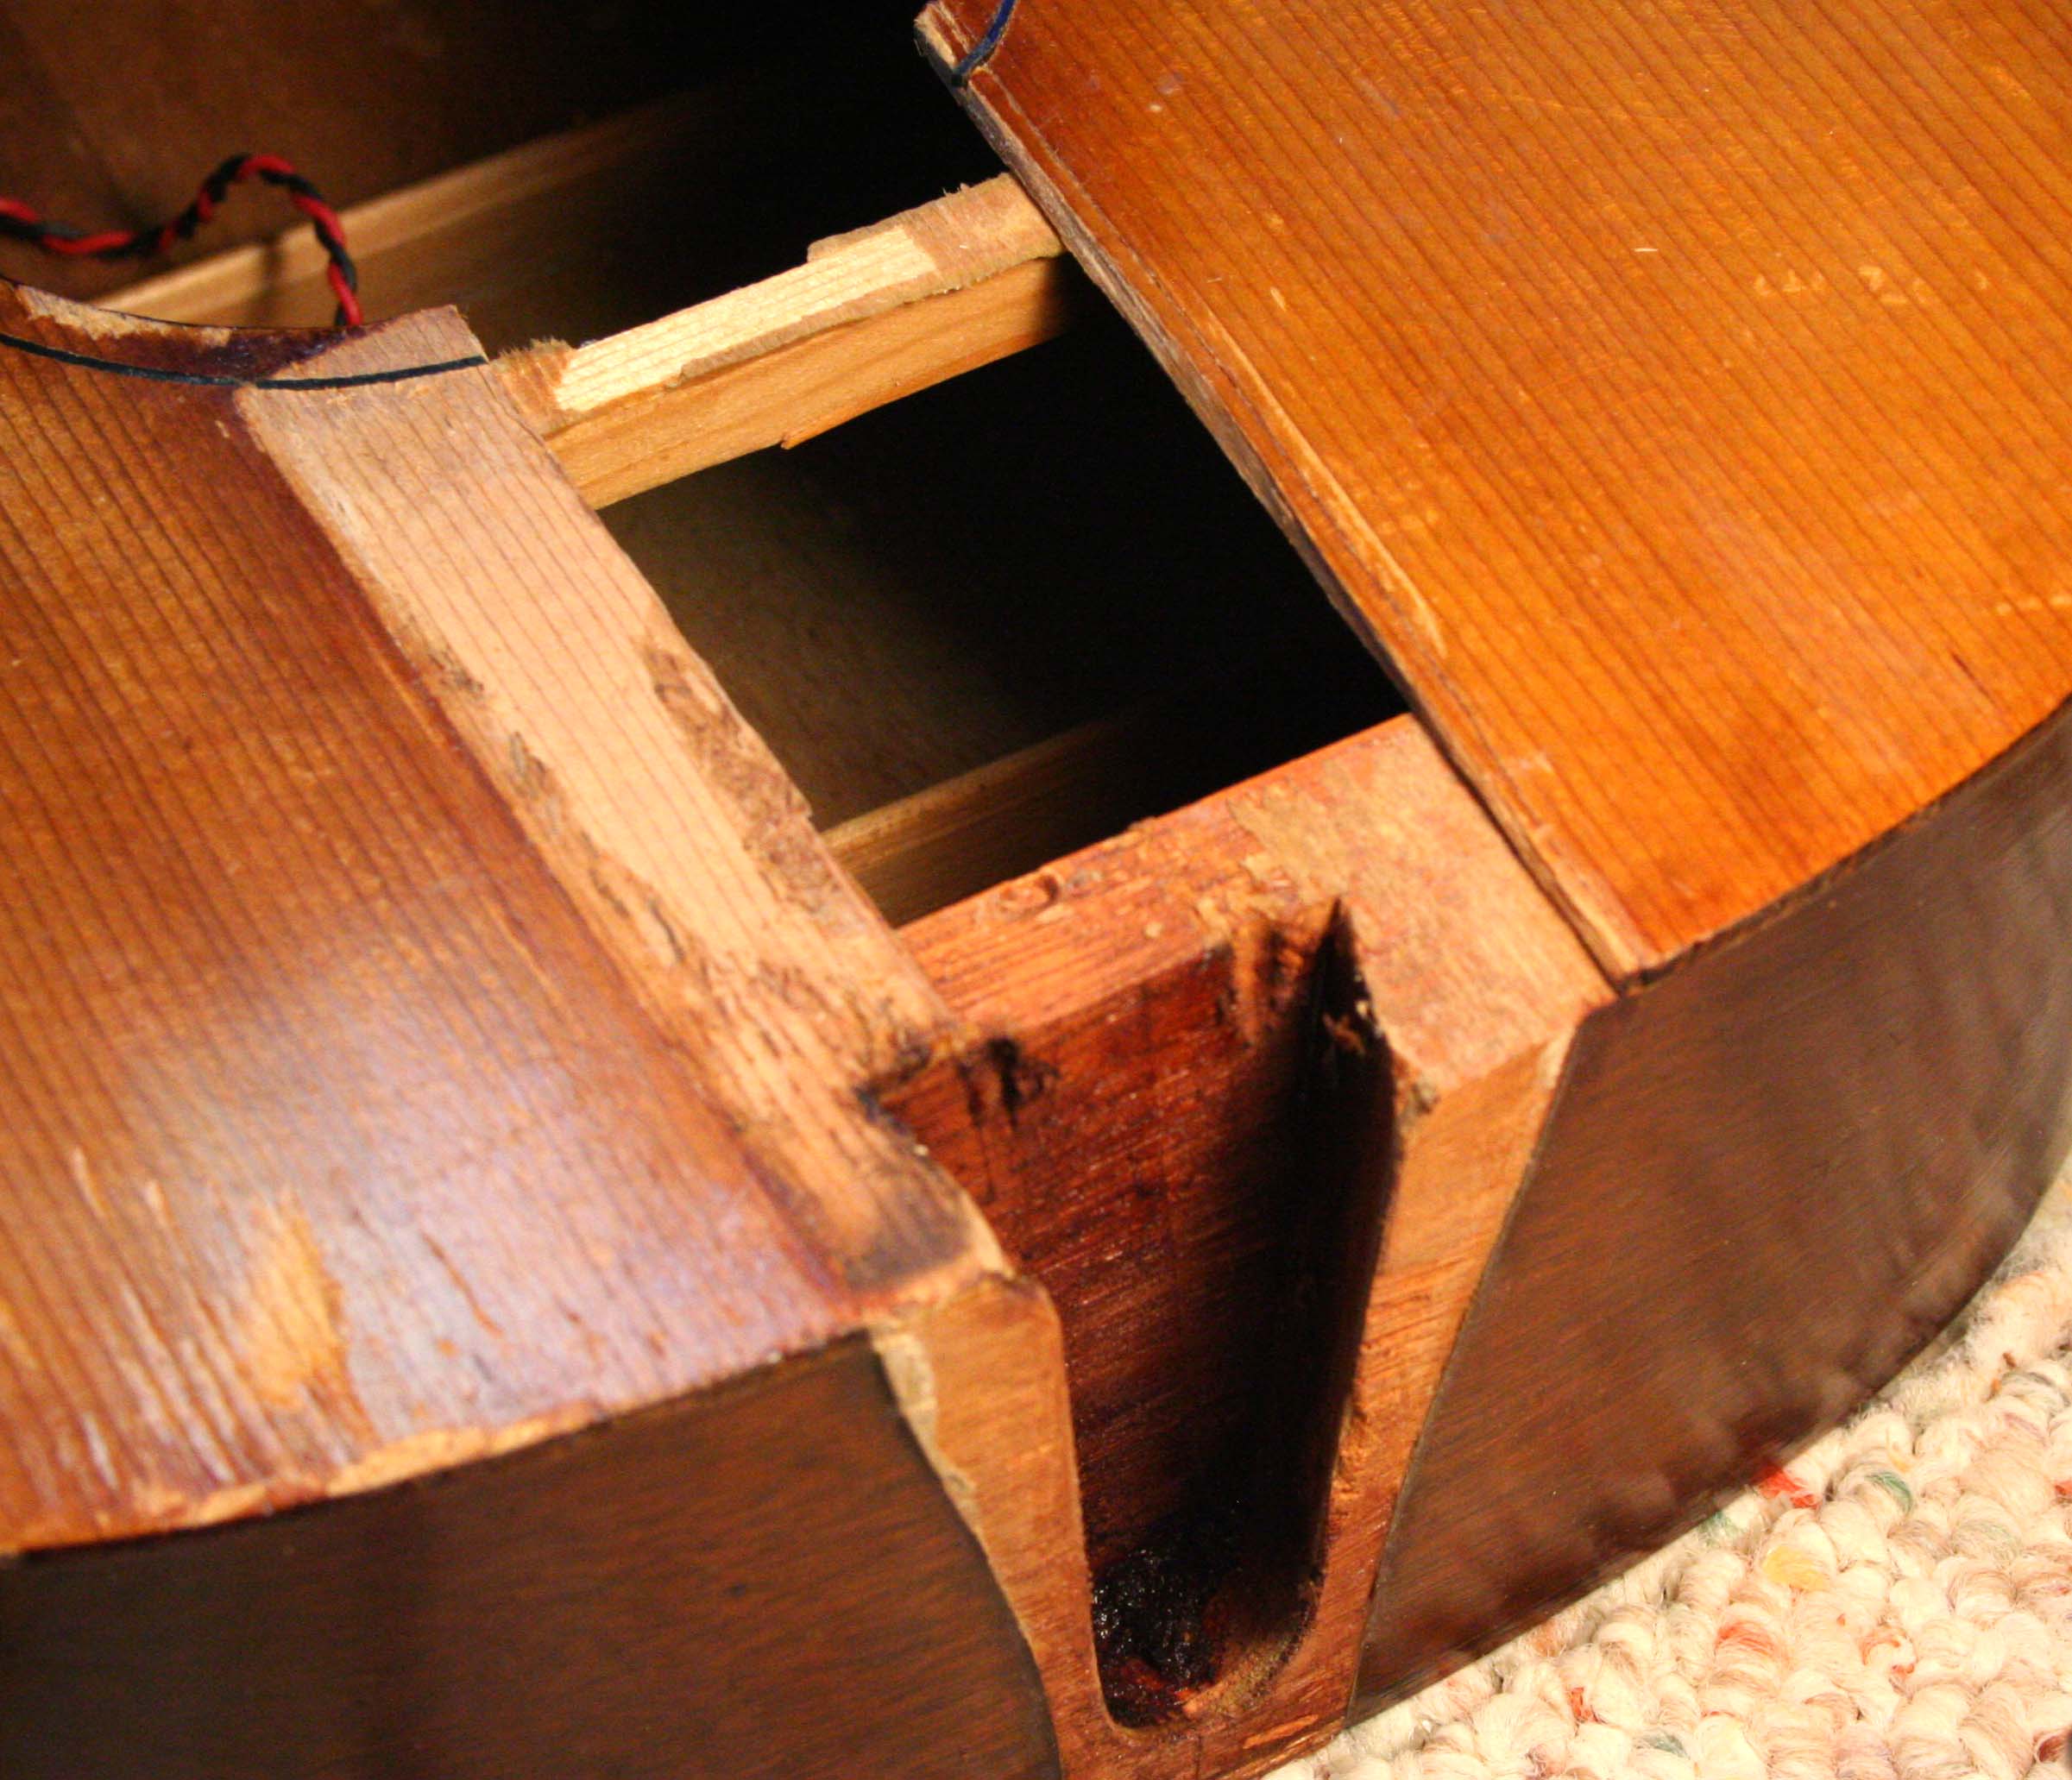
We left the Gibson with the neck off.  It had to sit for a few days to let the moisture from the steam in the dovetail pocket dry out.  Fitting the dovetail proceeds in phases.  First phase is to re-establish the correct neck-to-body angle.   A straightedge placed atop the fretted fingerboard should project a line at a level slightly above the bridge (not the saddle).  In the case of this guitar, that meant removing almost 1/8″ of material from the bottom sides of the neck/dovetail.  That is a lot.  This is done slowly with a razor knife to start, and finished with small sharp chisels.  Removing material from the sides of the neck makes the dovetail portion of the neck project deeper into the body block – you have to check to see if the neck dovetail is bottoming in the body block, and cut the neck dovetail back if it does.  When the angle is approaching ‘correct’, I measure the amount of slop there is side-to-side in the dovetail joint.  In this case, there was more slop at the bottom than the top because of aforementioned angle change.   I decide whether a shim placed on one side will push the neck too far off center.  Here, one shim on one side worked.  It is tapered from about 0.035″ to 0.075″. IMG_7155 
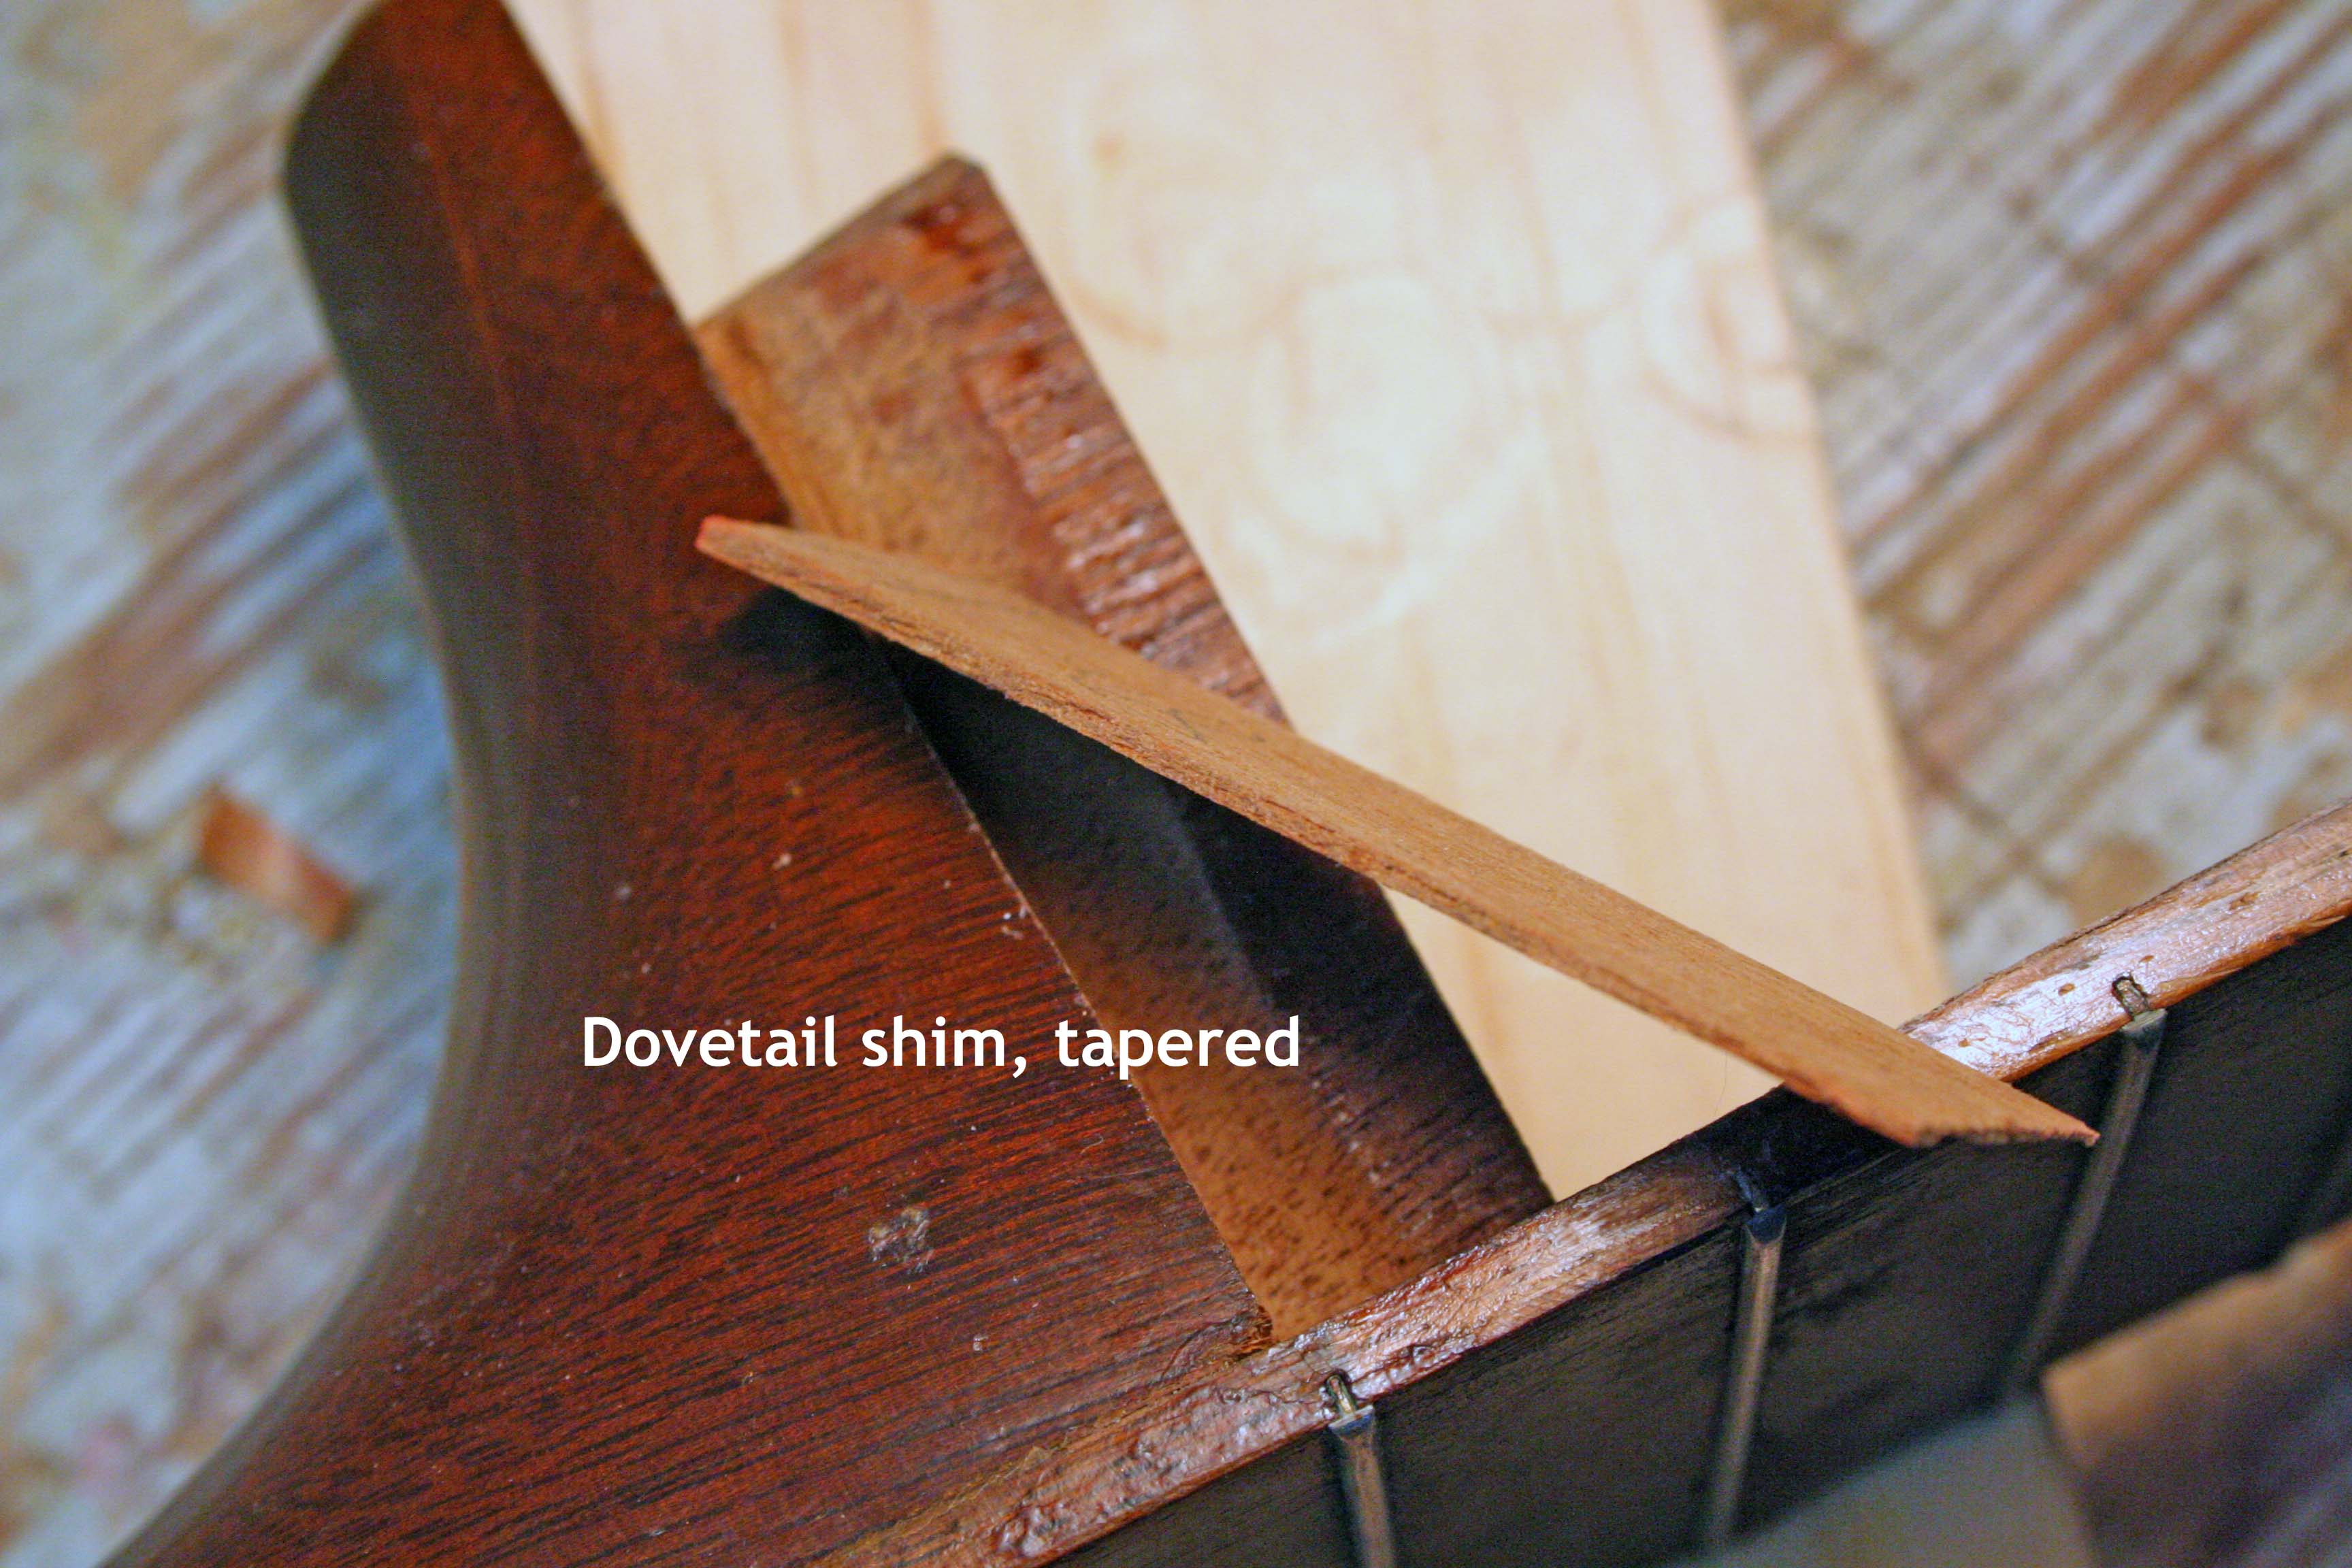
I start with the shim a little too fat to fully seat the neck, and line the body block cavity with red chalk.IMG_7156  
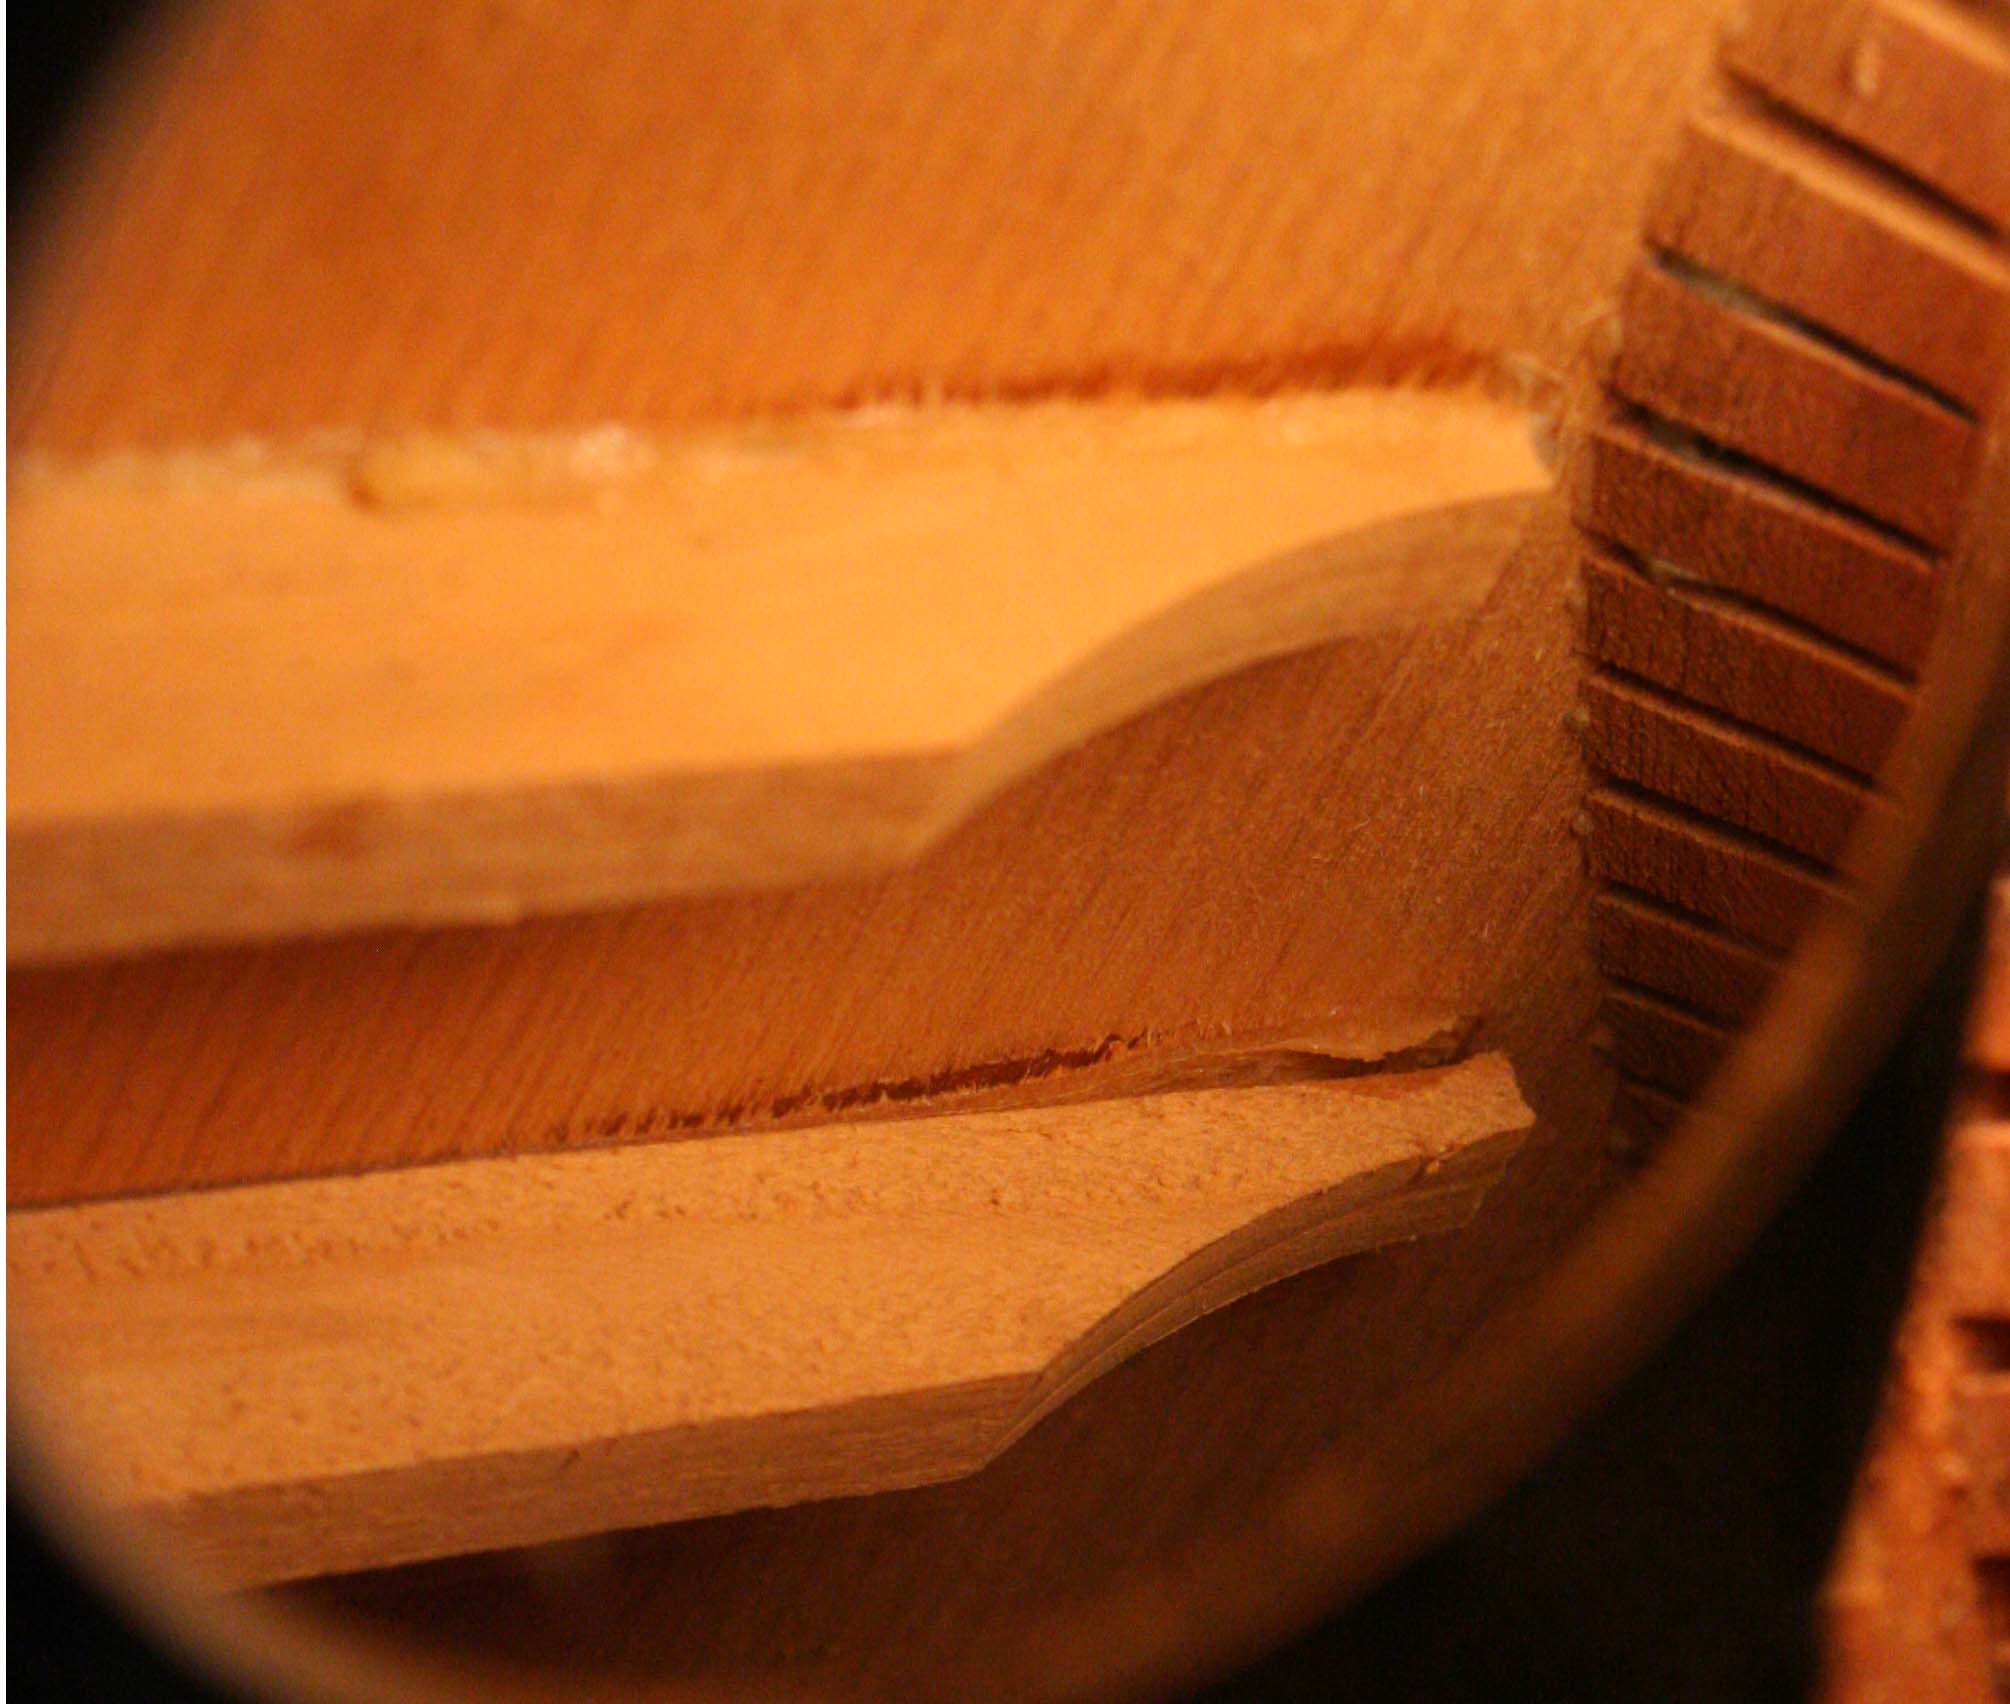
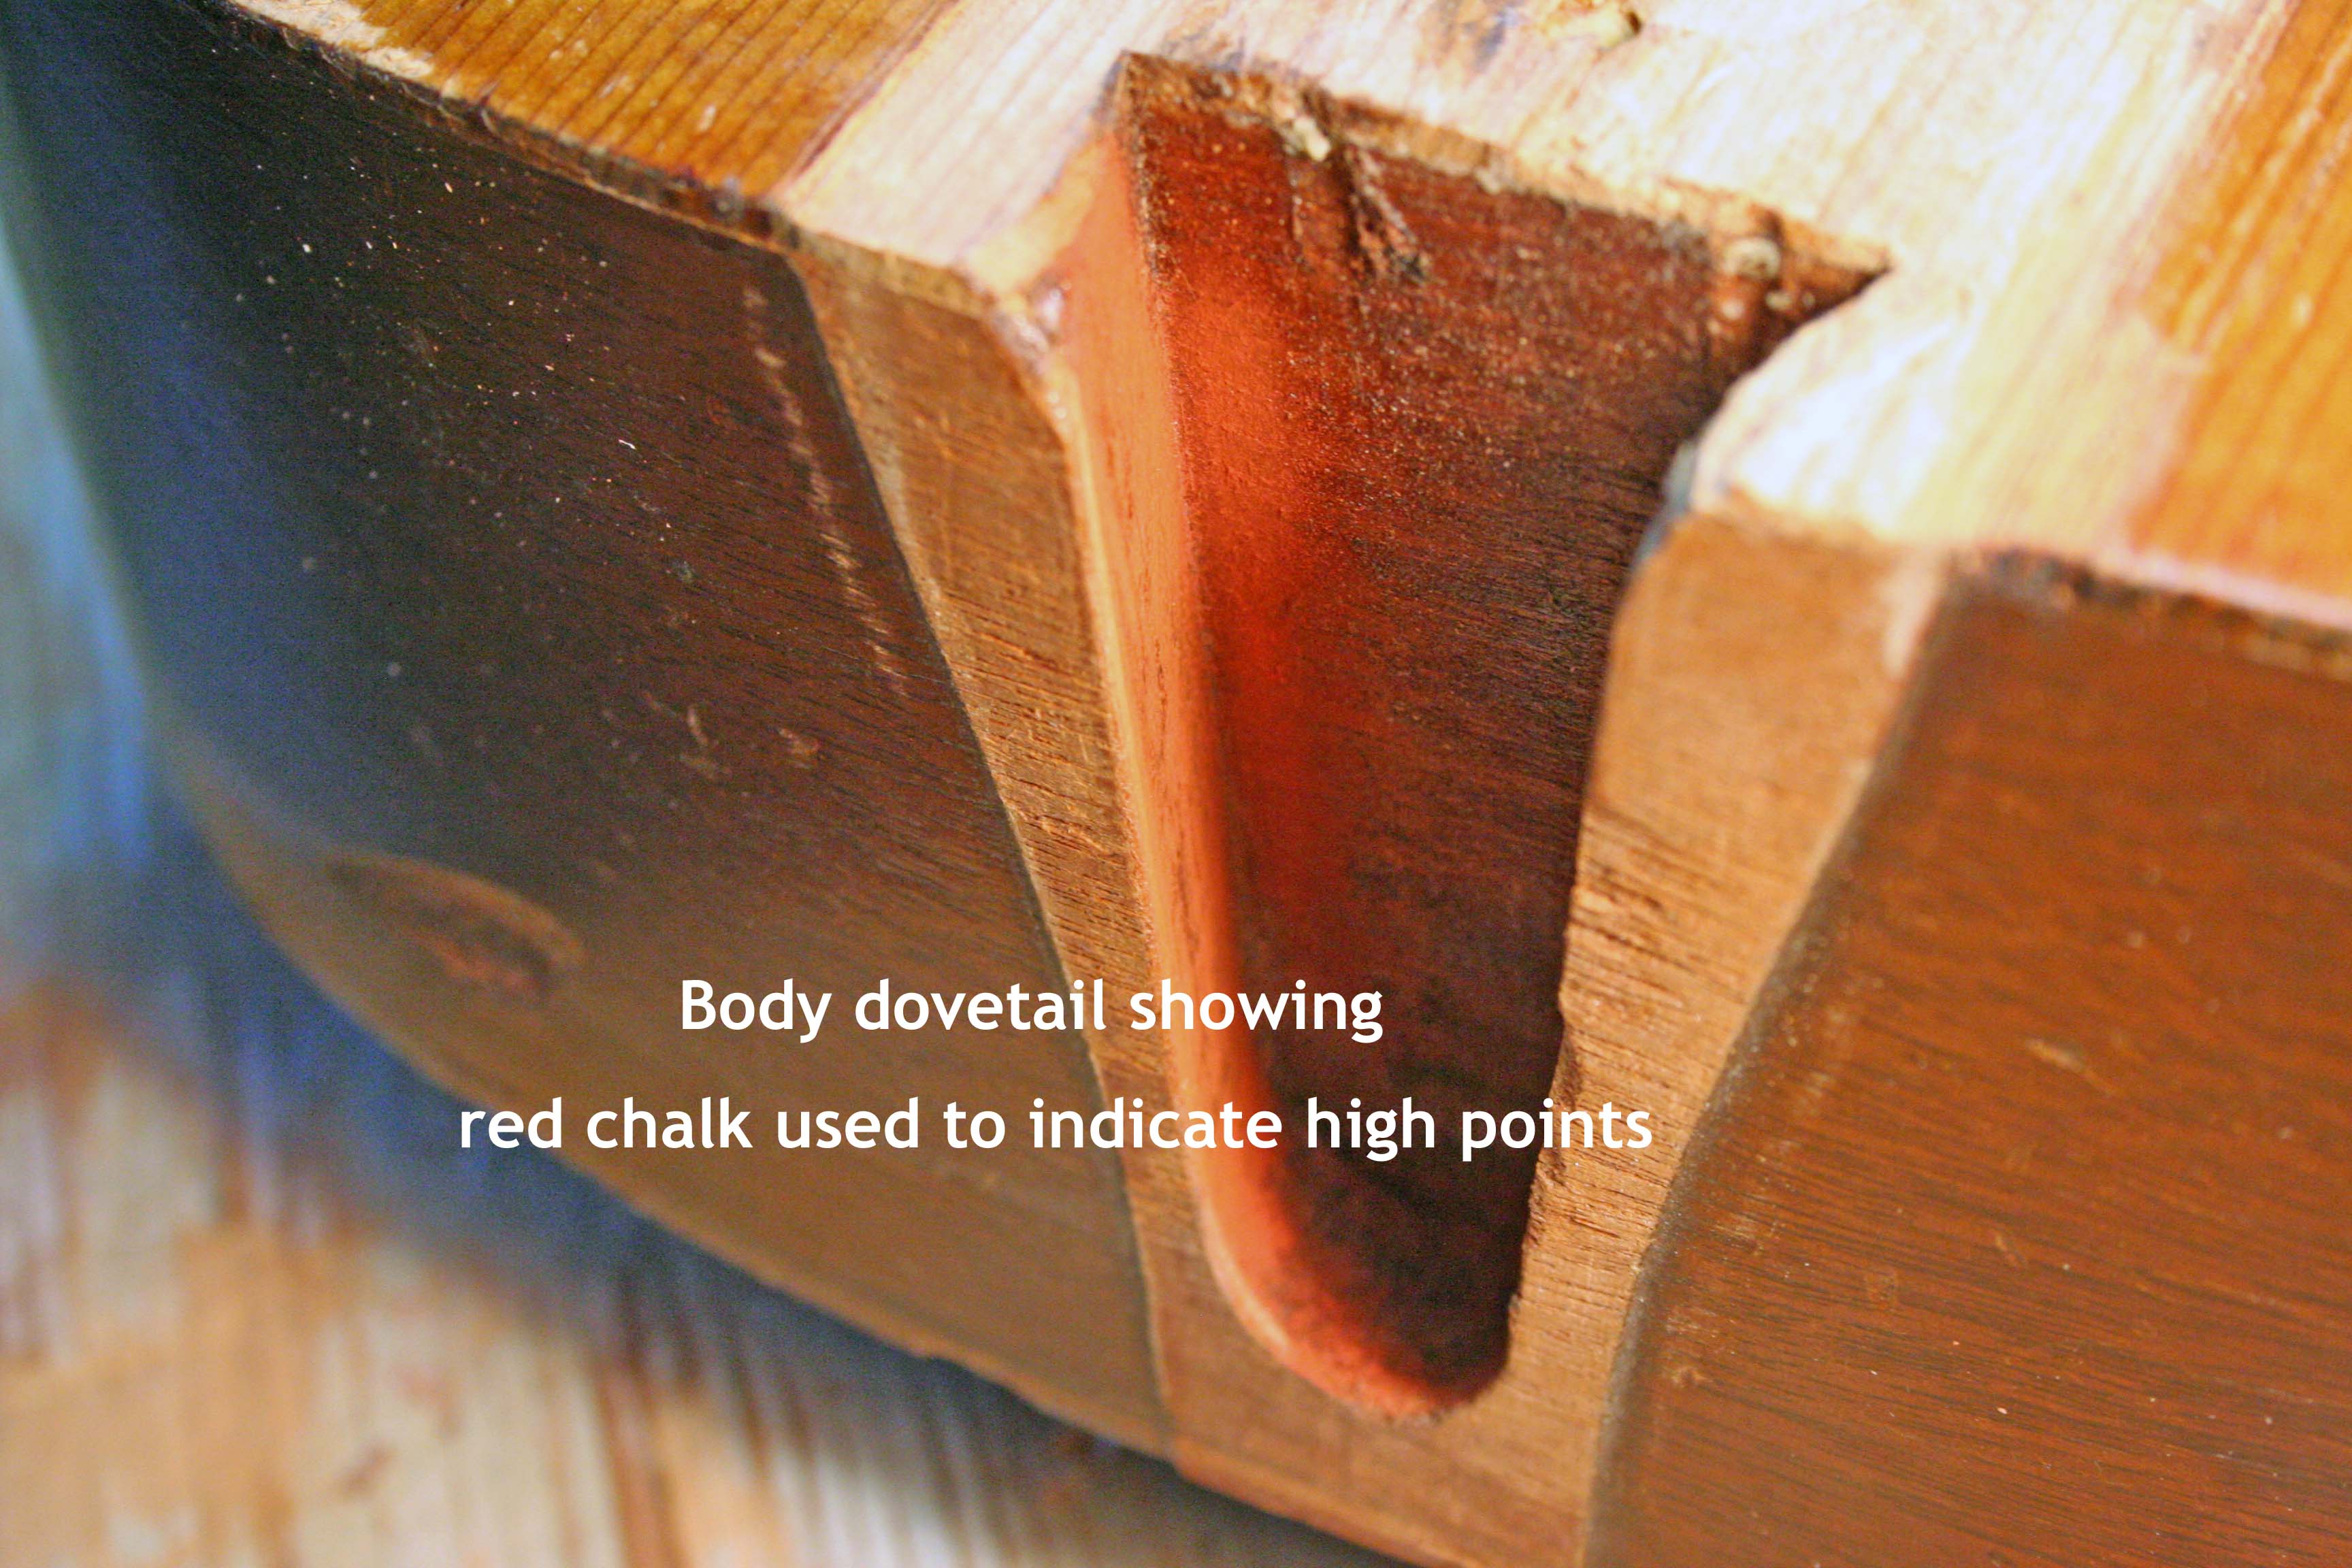
That way, as I retry the neck fit, it leaves chalk on the neck shim and dovetail.  I trim off the high points and keep testing the fit until the neck almost seats.  Then, I assemble the neck in the body (without glue) and insert sandpaper strips under the sides of the neck.  Working these up and down makes the final fit of the neck sides to the body.  Because of the amount of angle change necessary on this guitar, a shim was also needed under the fingerboard extension.IMG_7154  
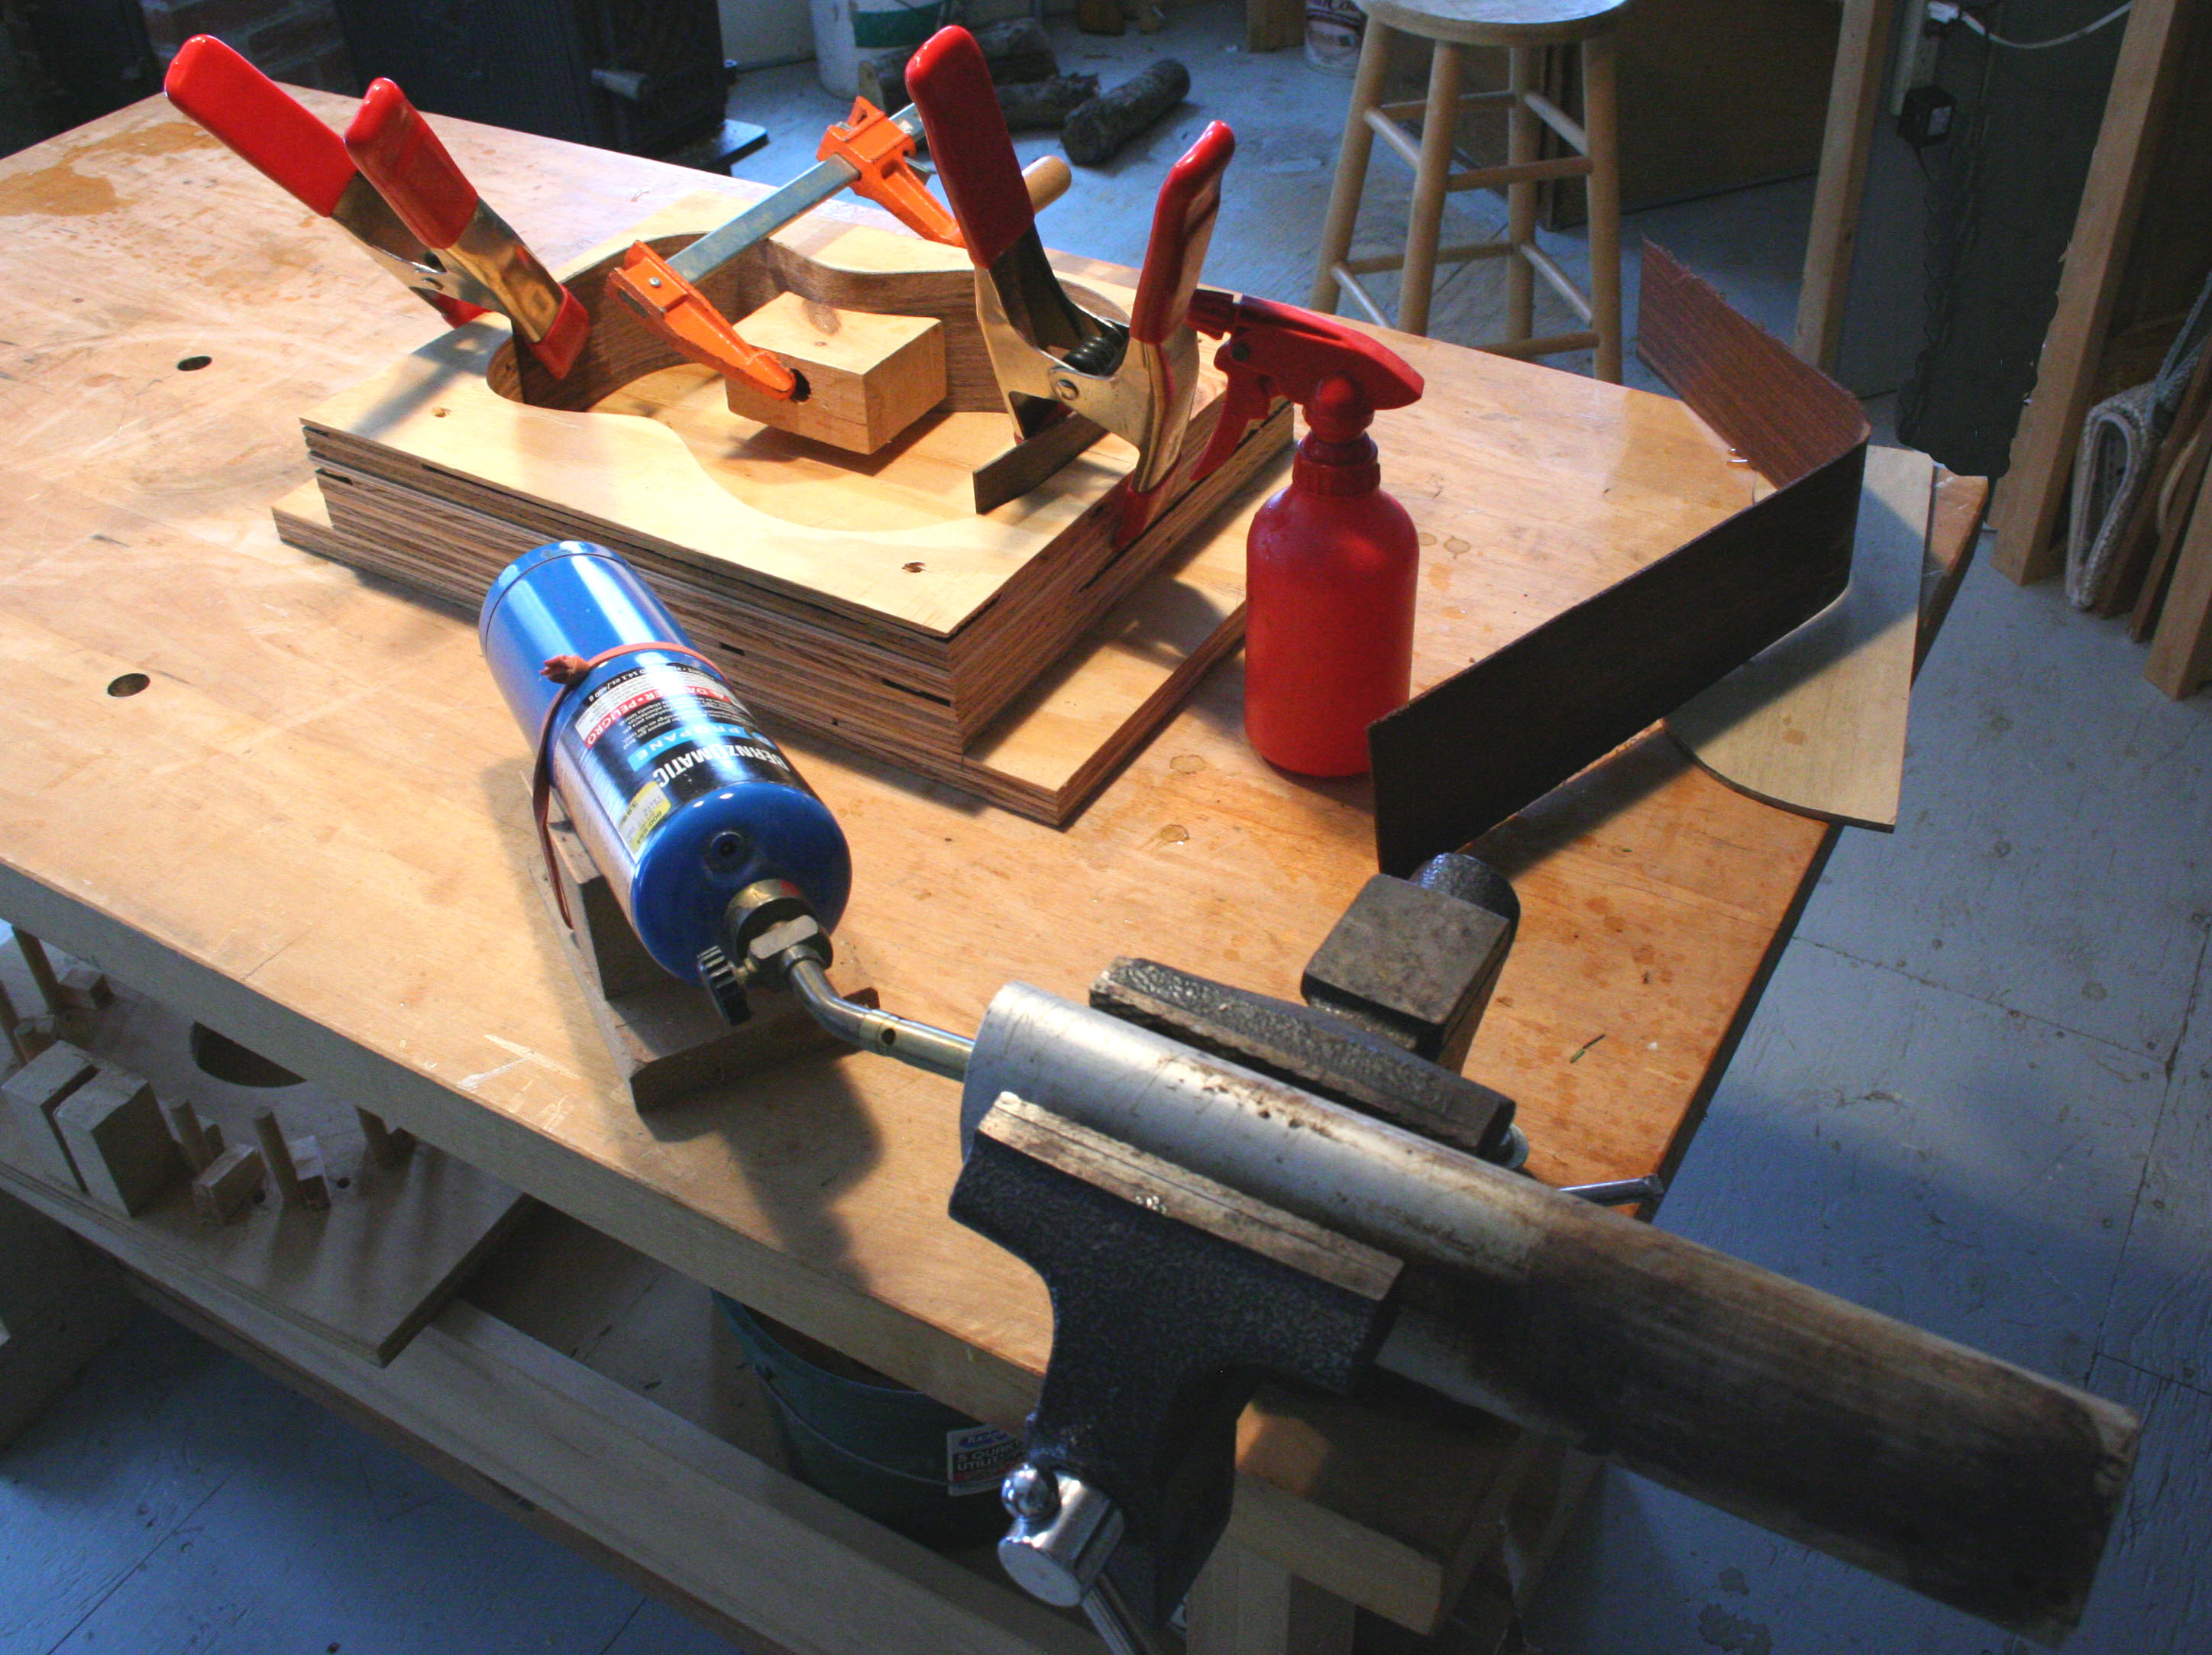
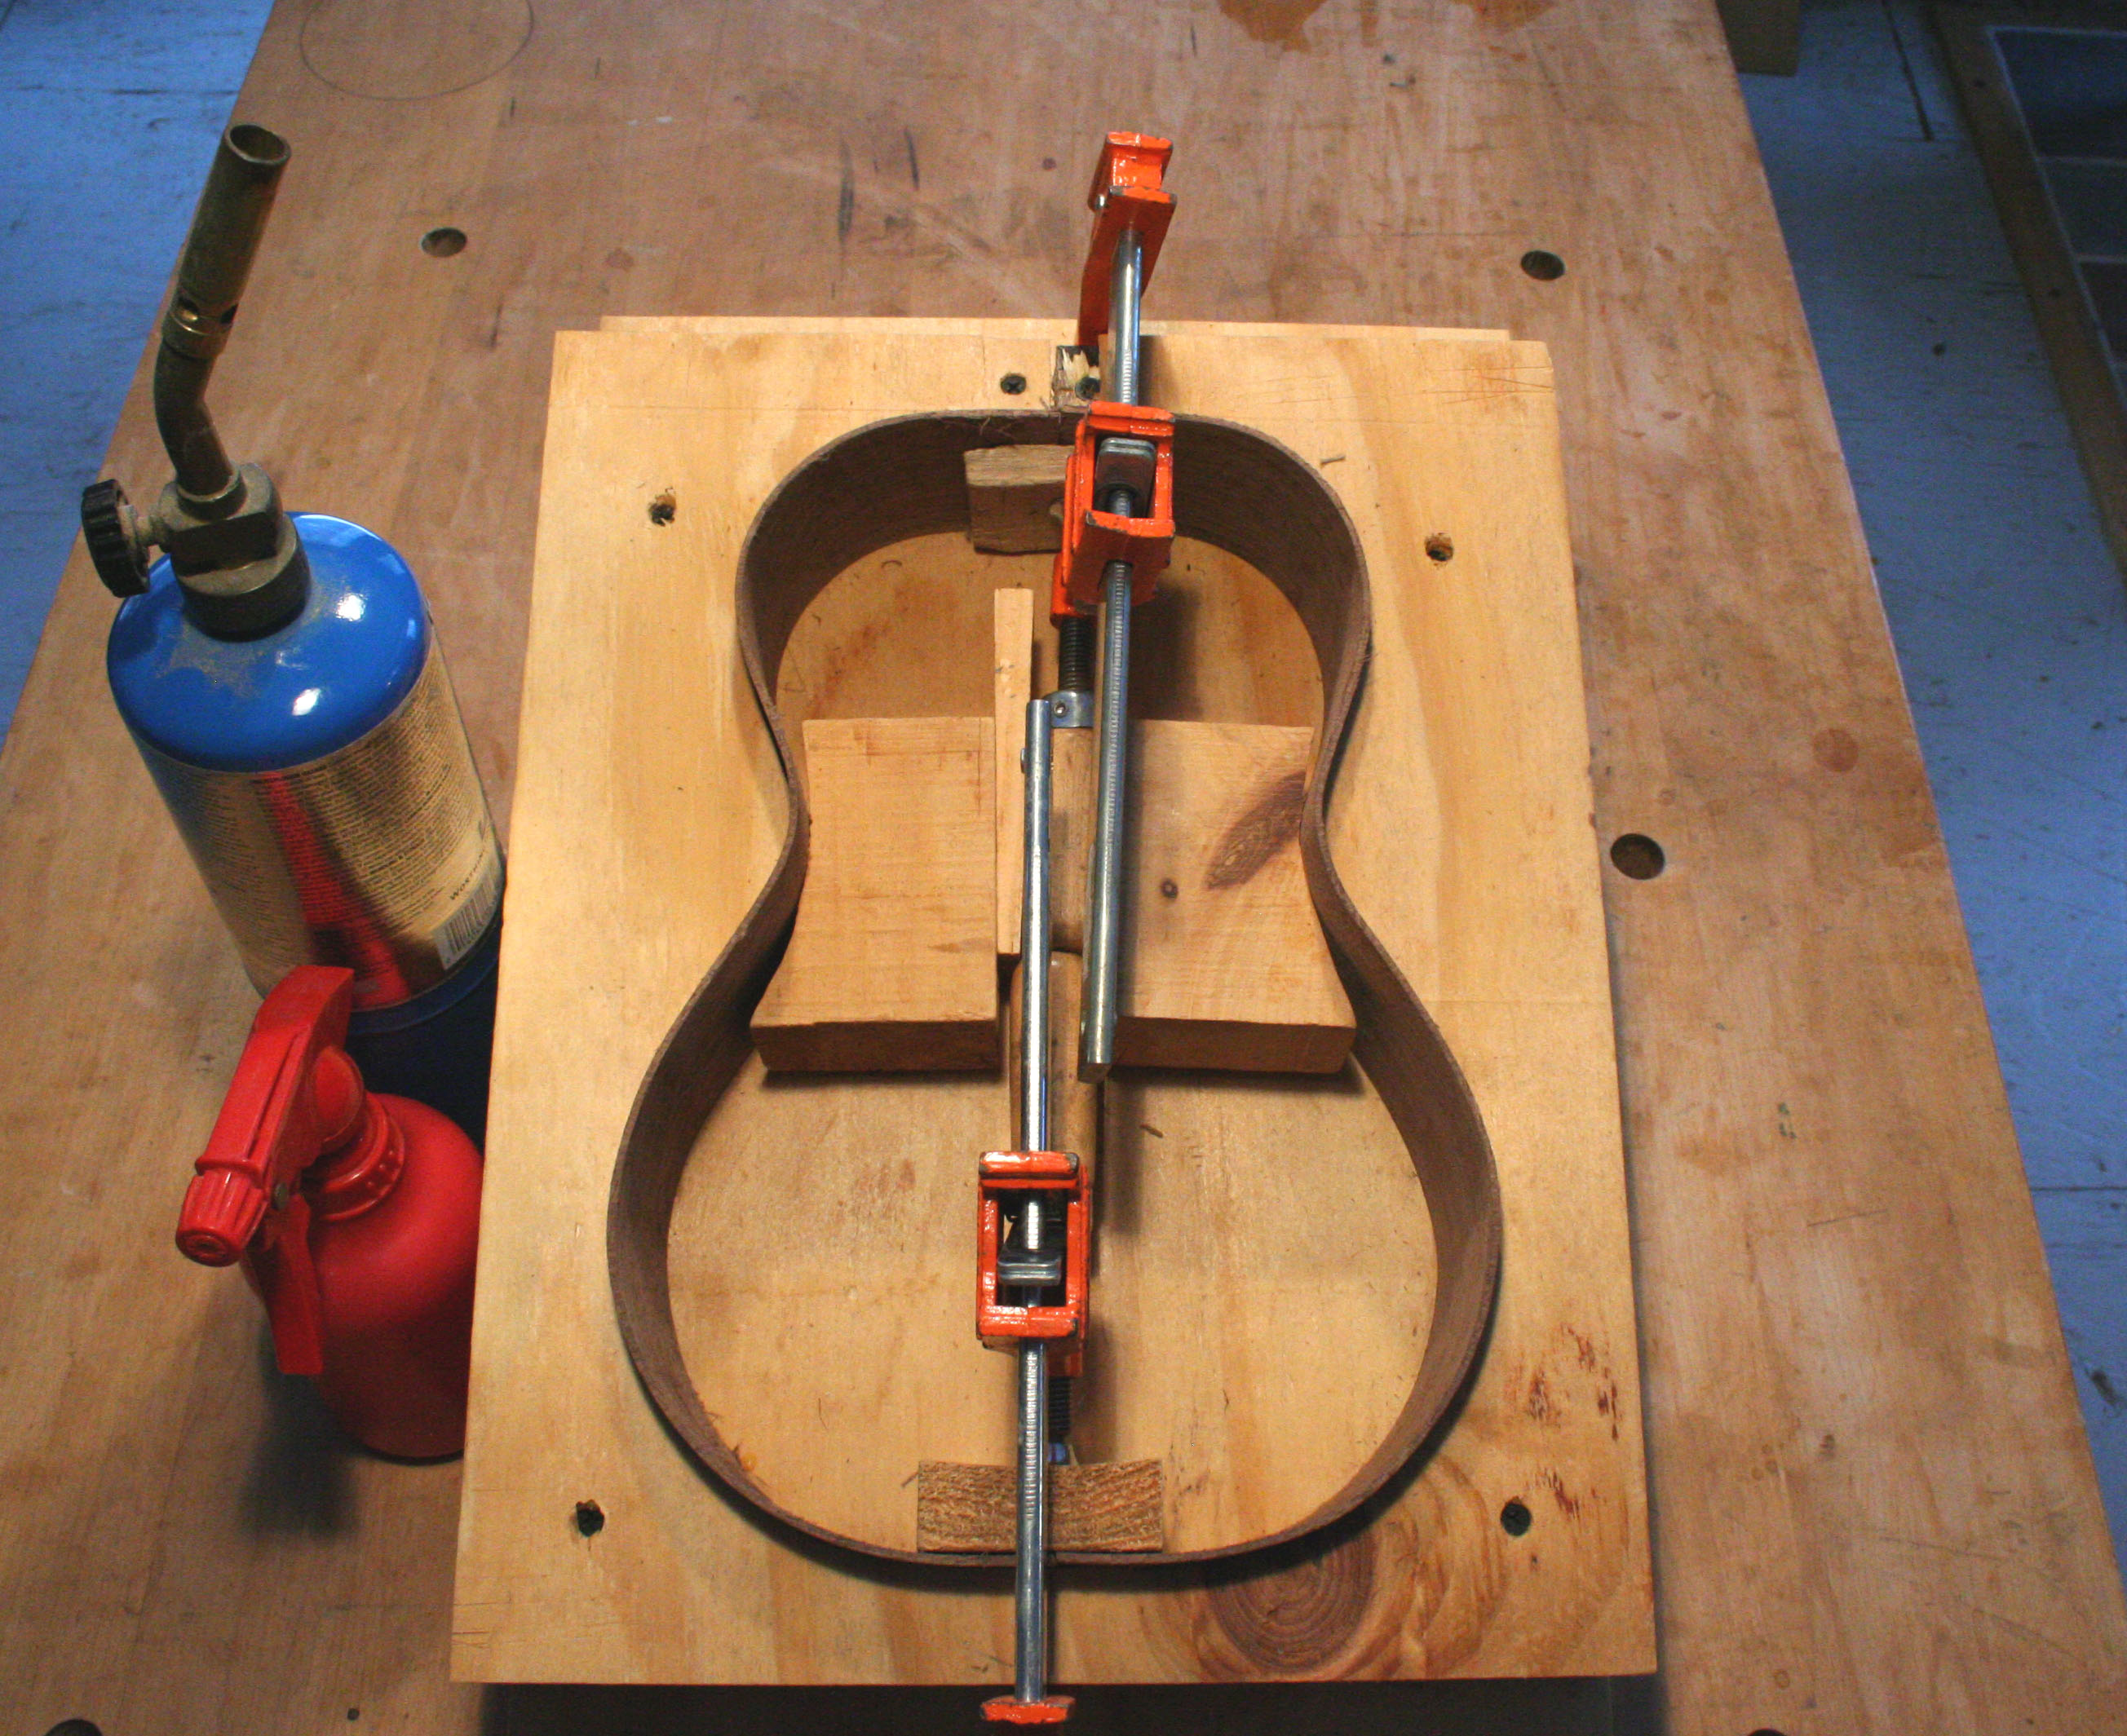
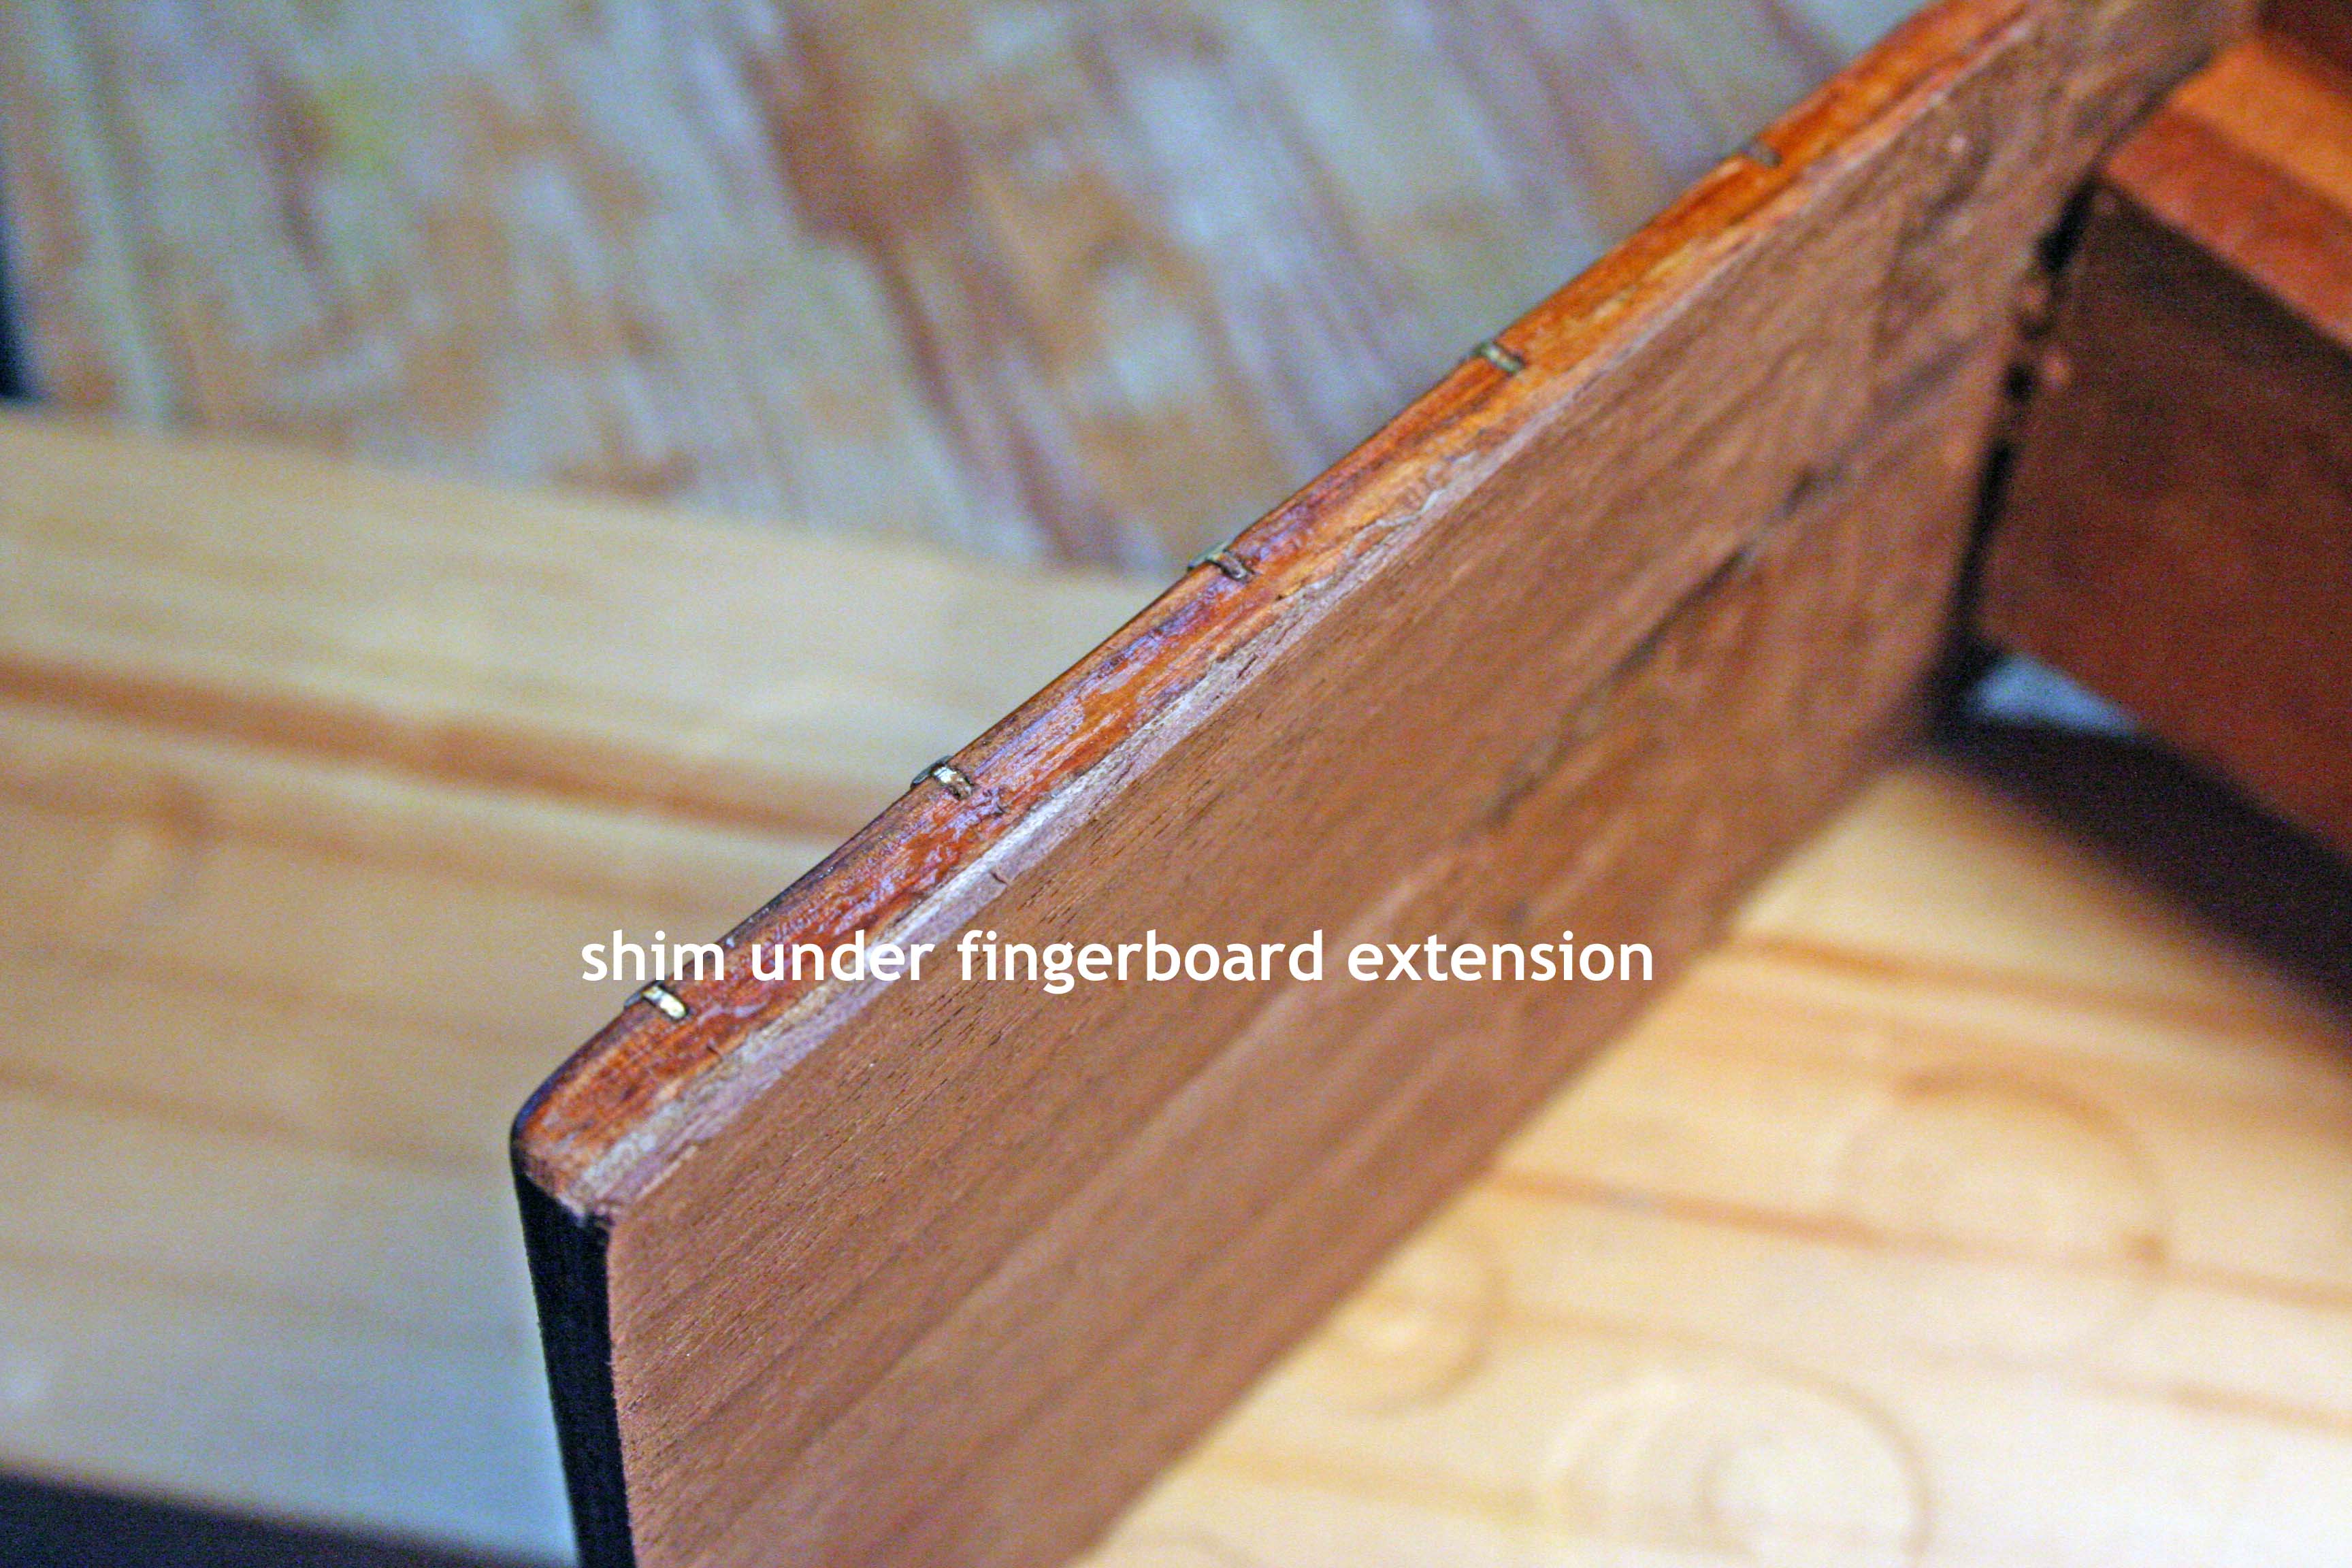
When I am satisfied with the fit, I glue the  joint and clamp it with one big C clamp over the dovetail/body block and a couple smaller ones on the fingerboard extension, using blocks to pad the clamps.   After removing the clamps, I can see the resulting angle – seems just about right.IMG_7157  
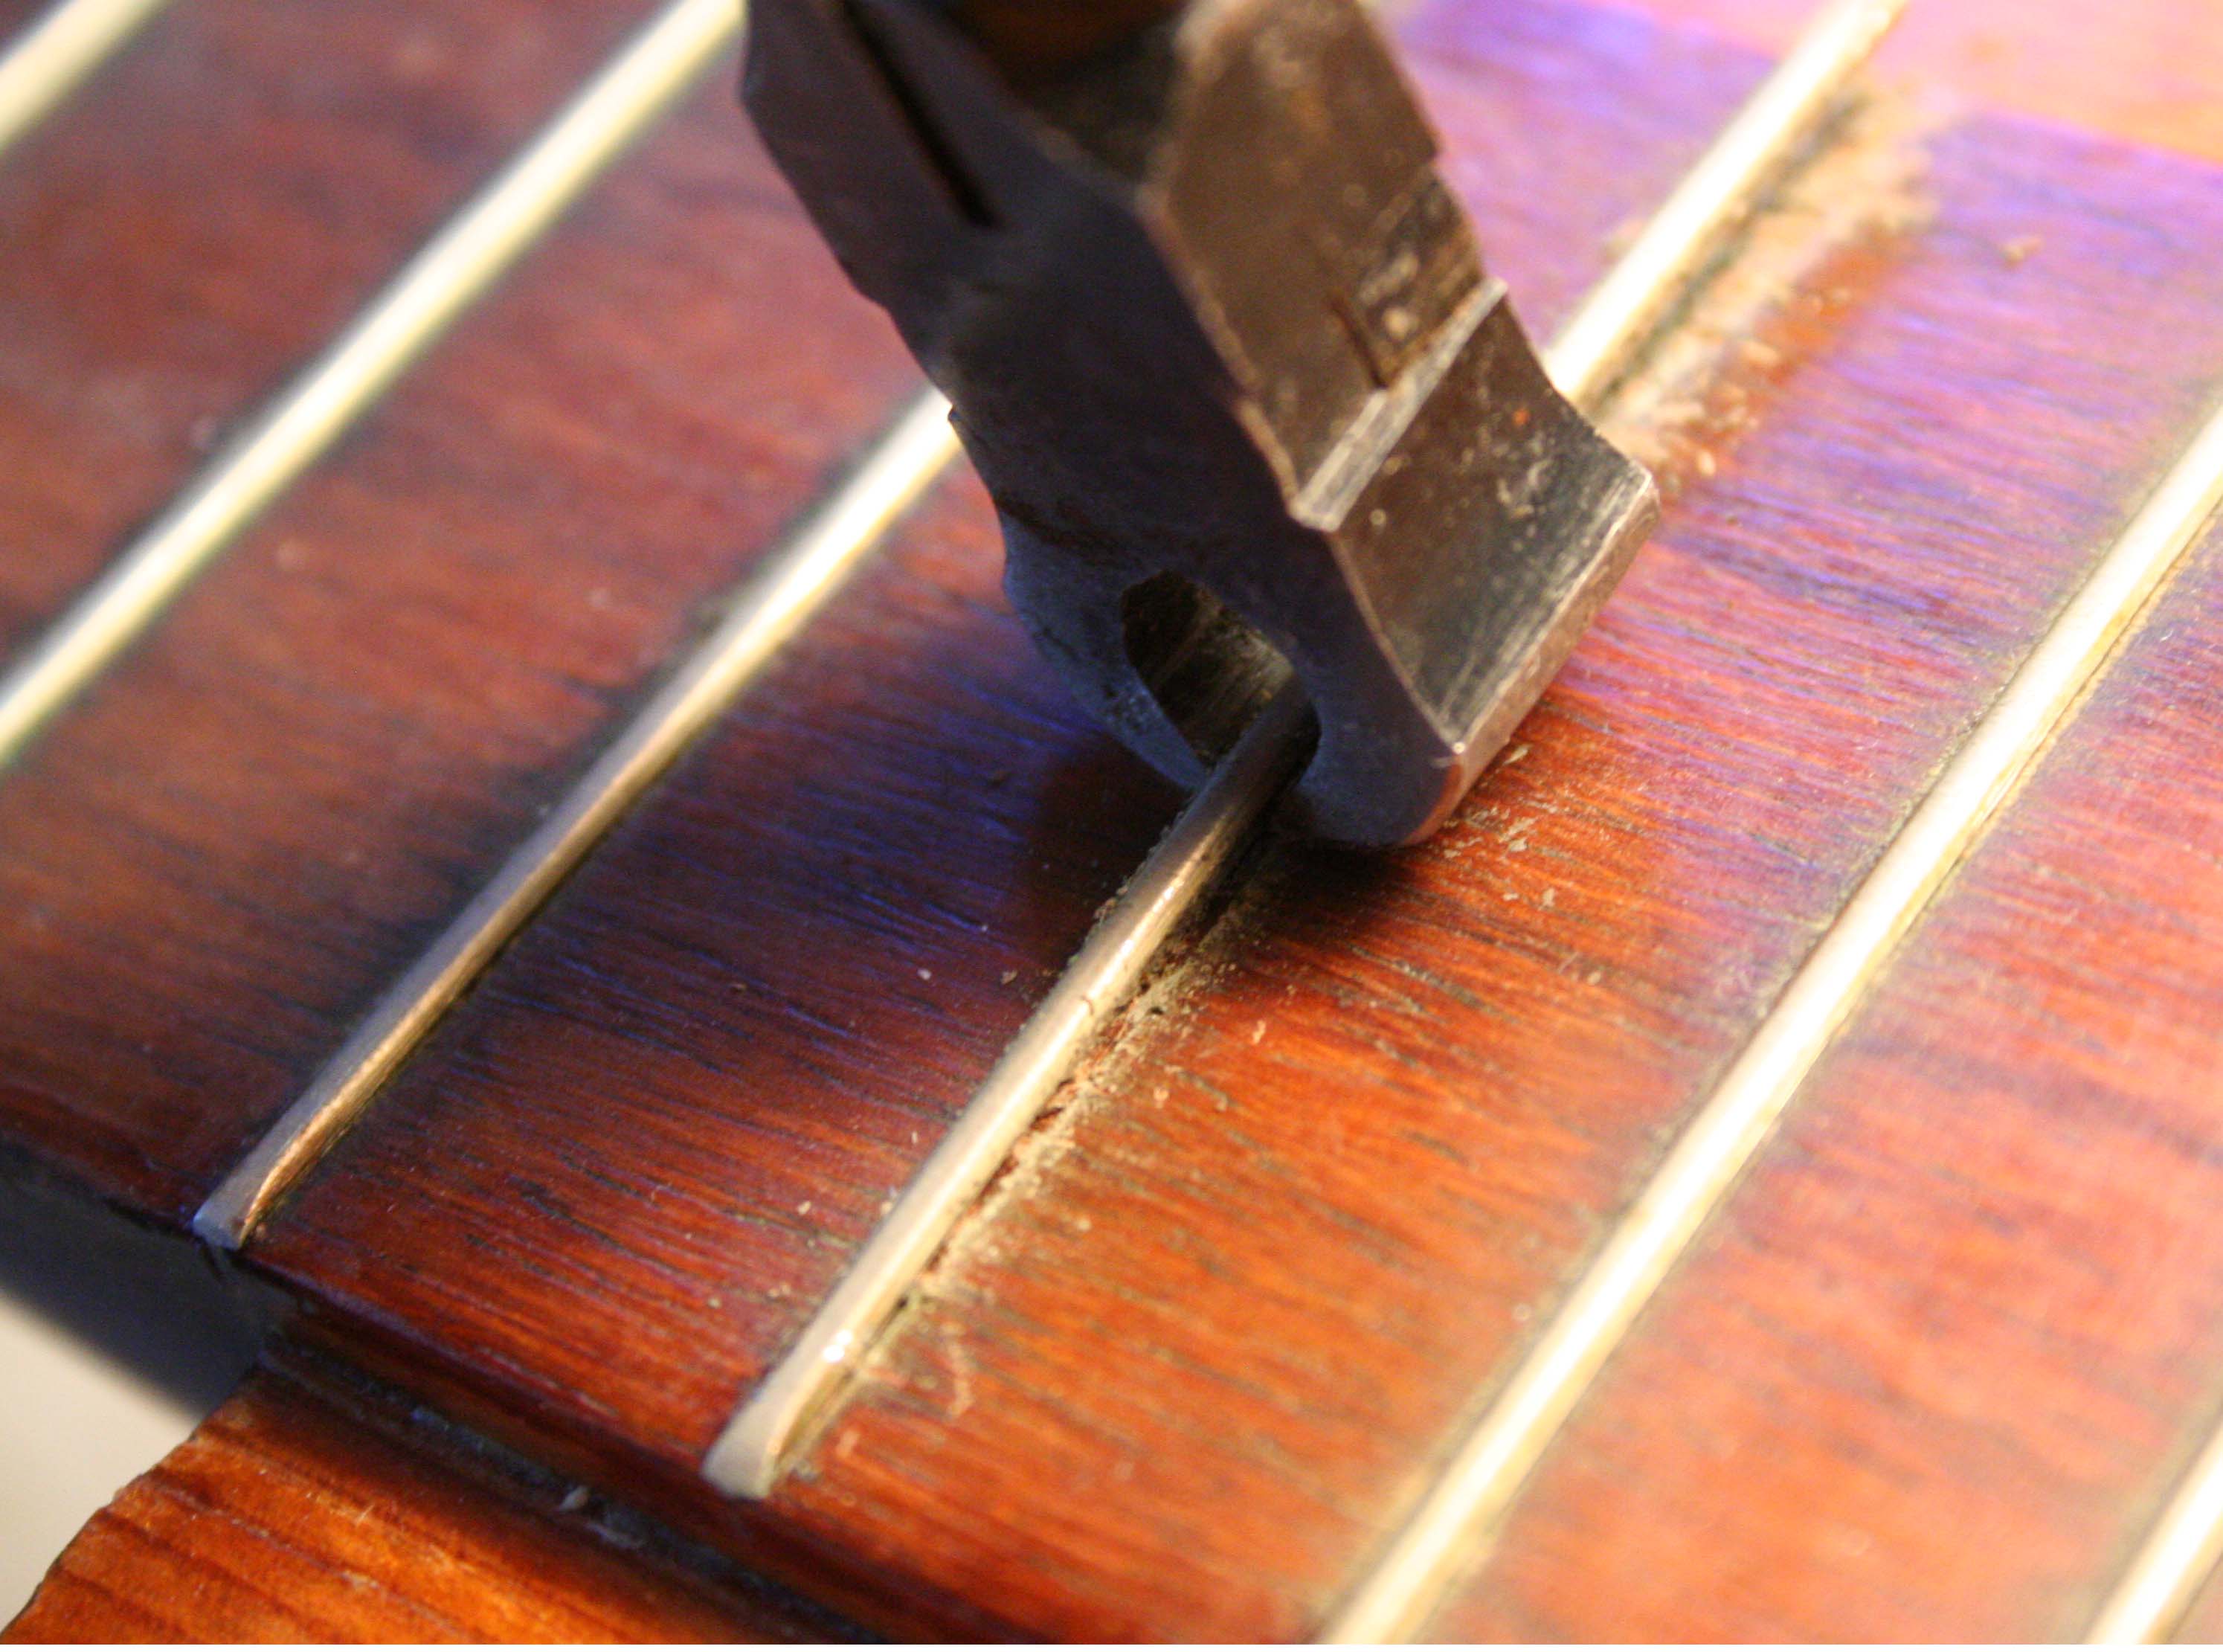
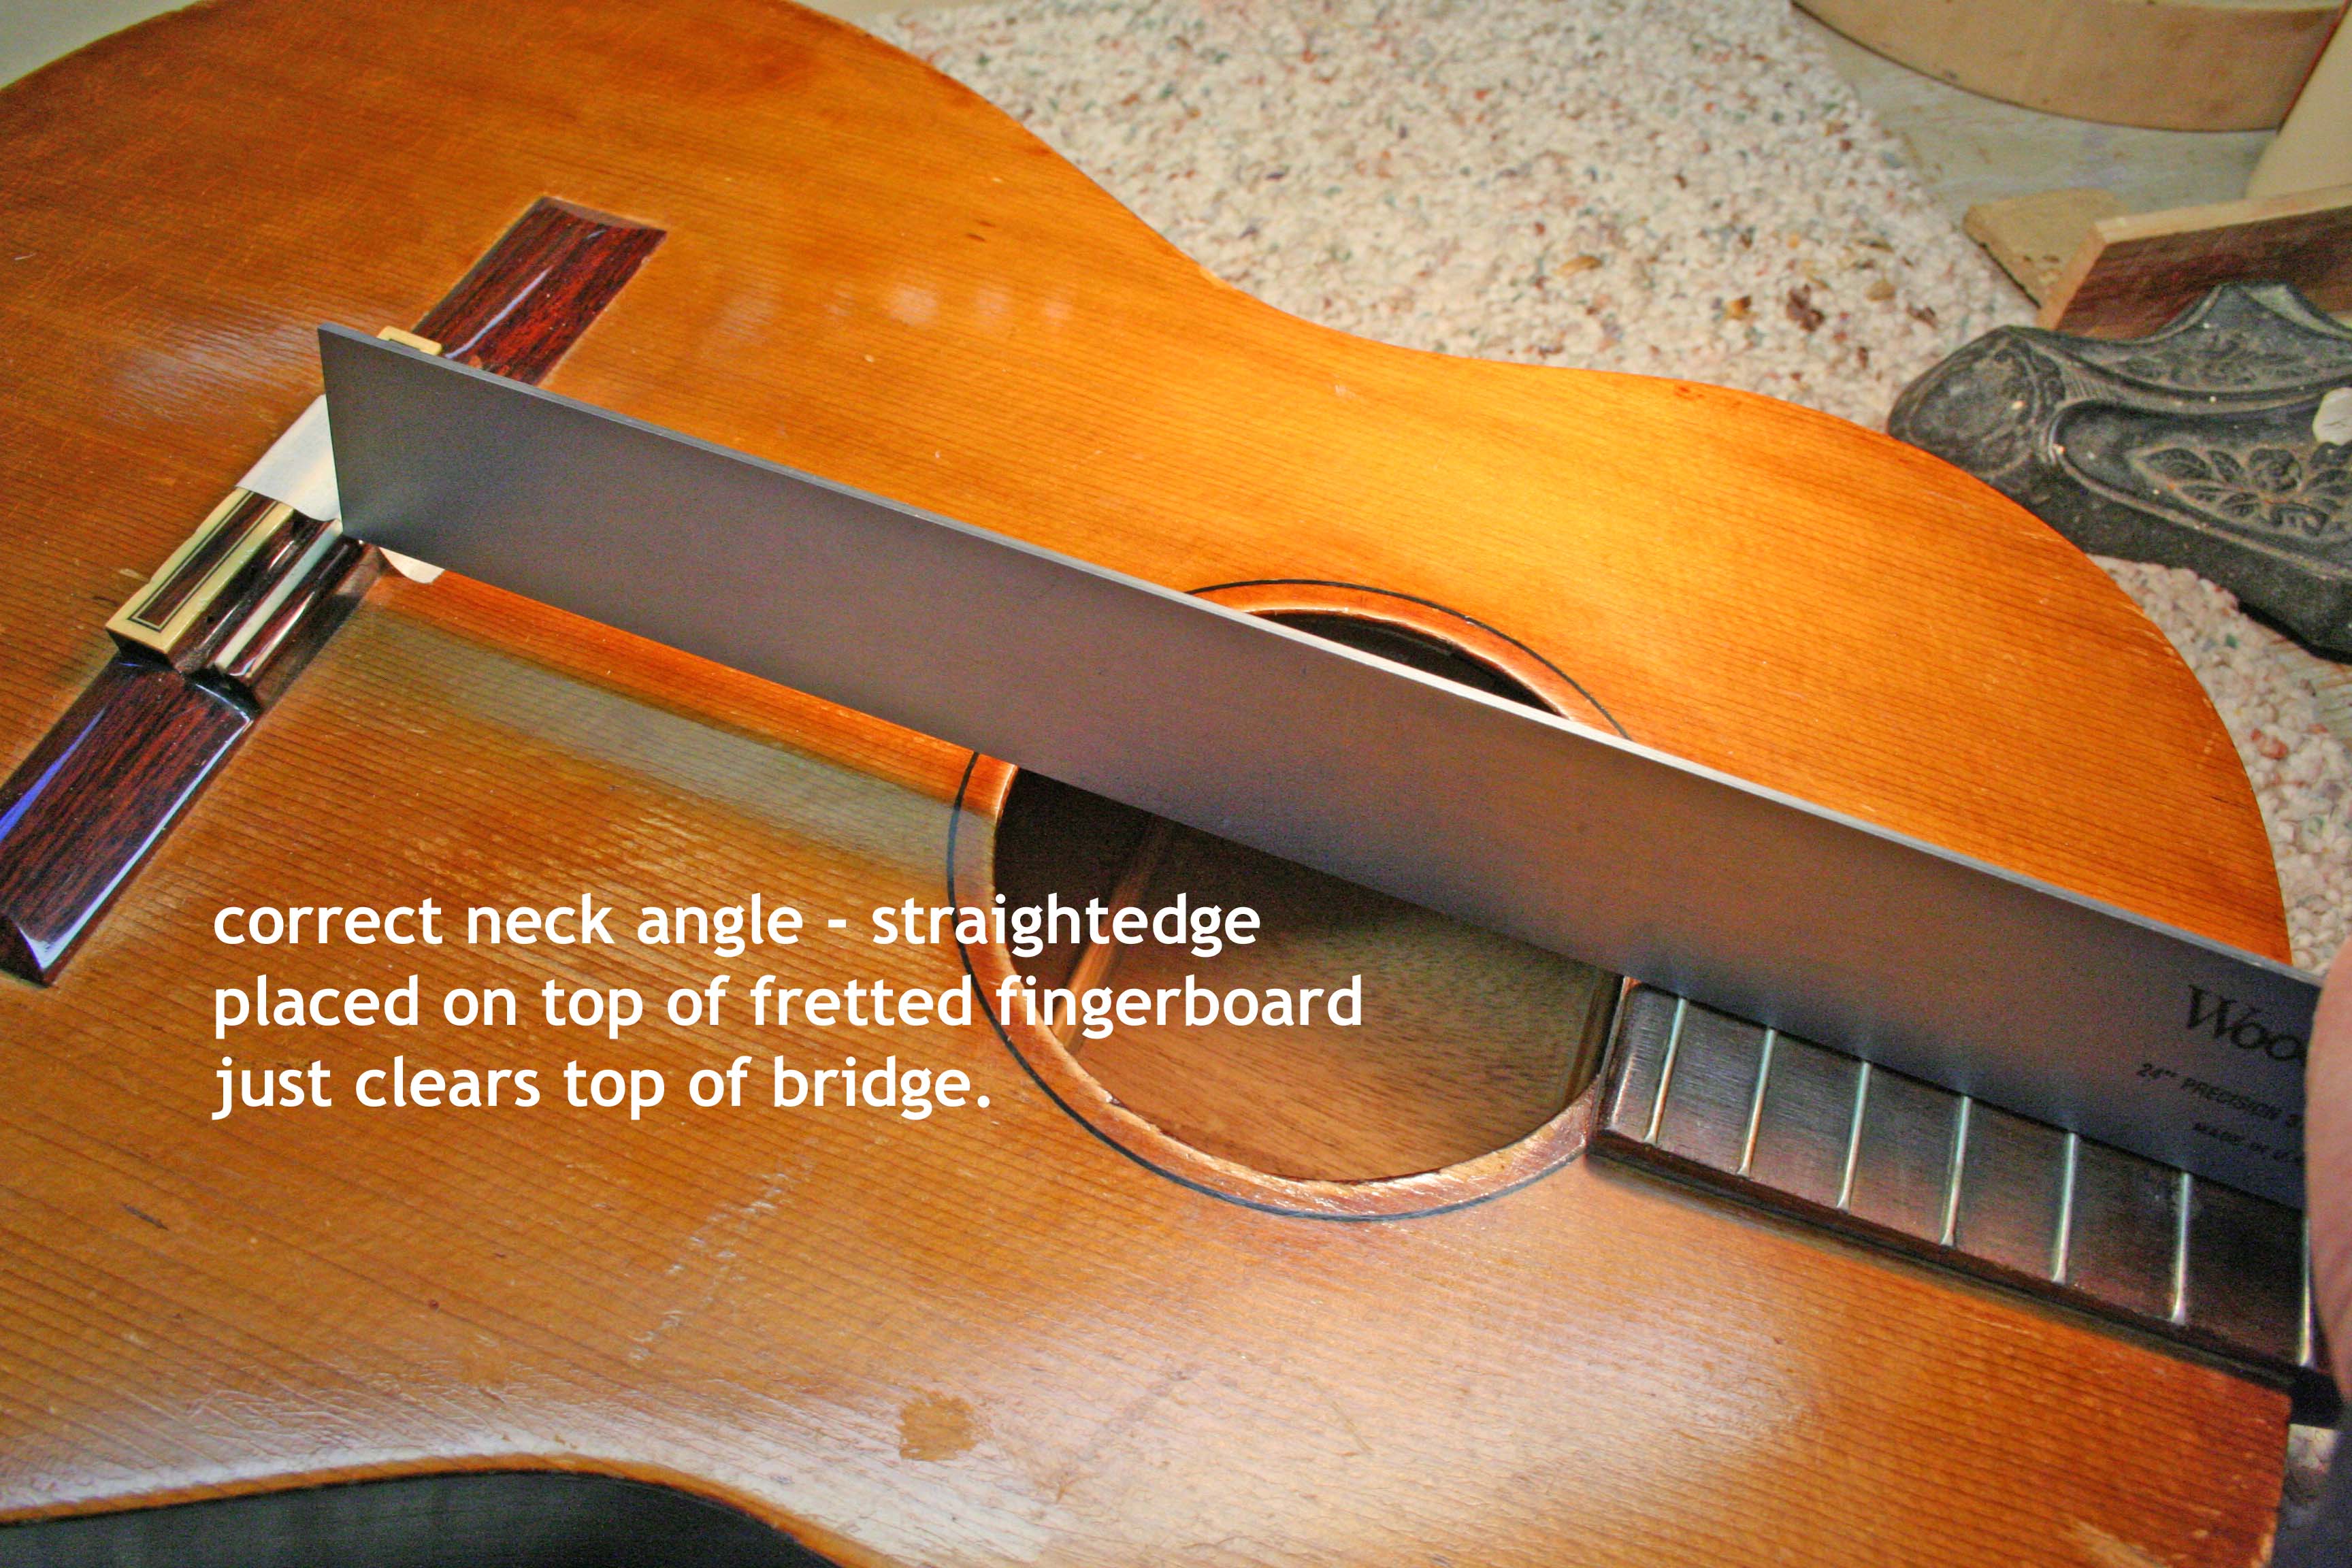
The frets on this guitar needed attention when I was done with the reset.  Initially, I tried leveling them, but the result was not satisfactory.  They were small, worn frets to begin with.  Neck resets can leave a bump in the fingerboard over the dovetail for a couple of reasons, and I elected to replace the frets after leveling the fingerboard.  After removing the frets with the end-nippers, the board was sanded flat.IMG_7163  
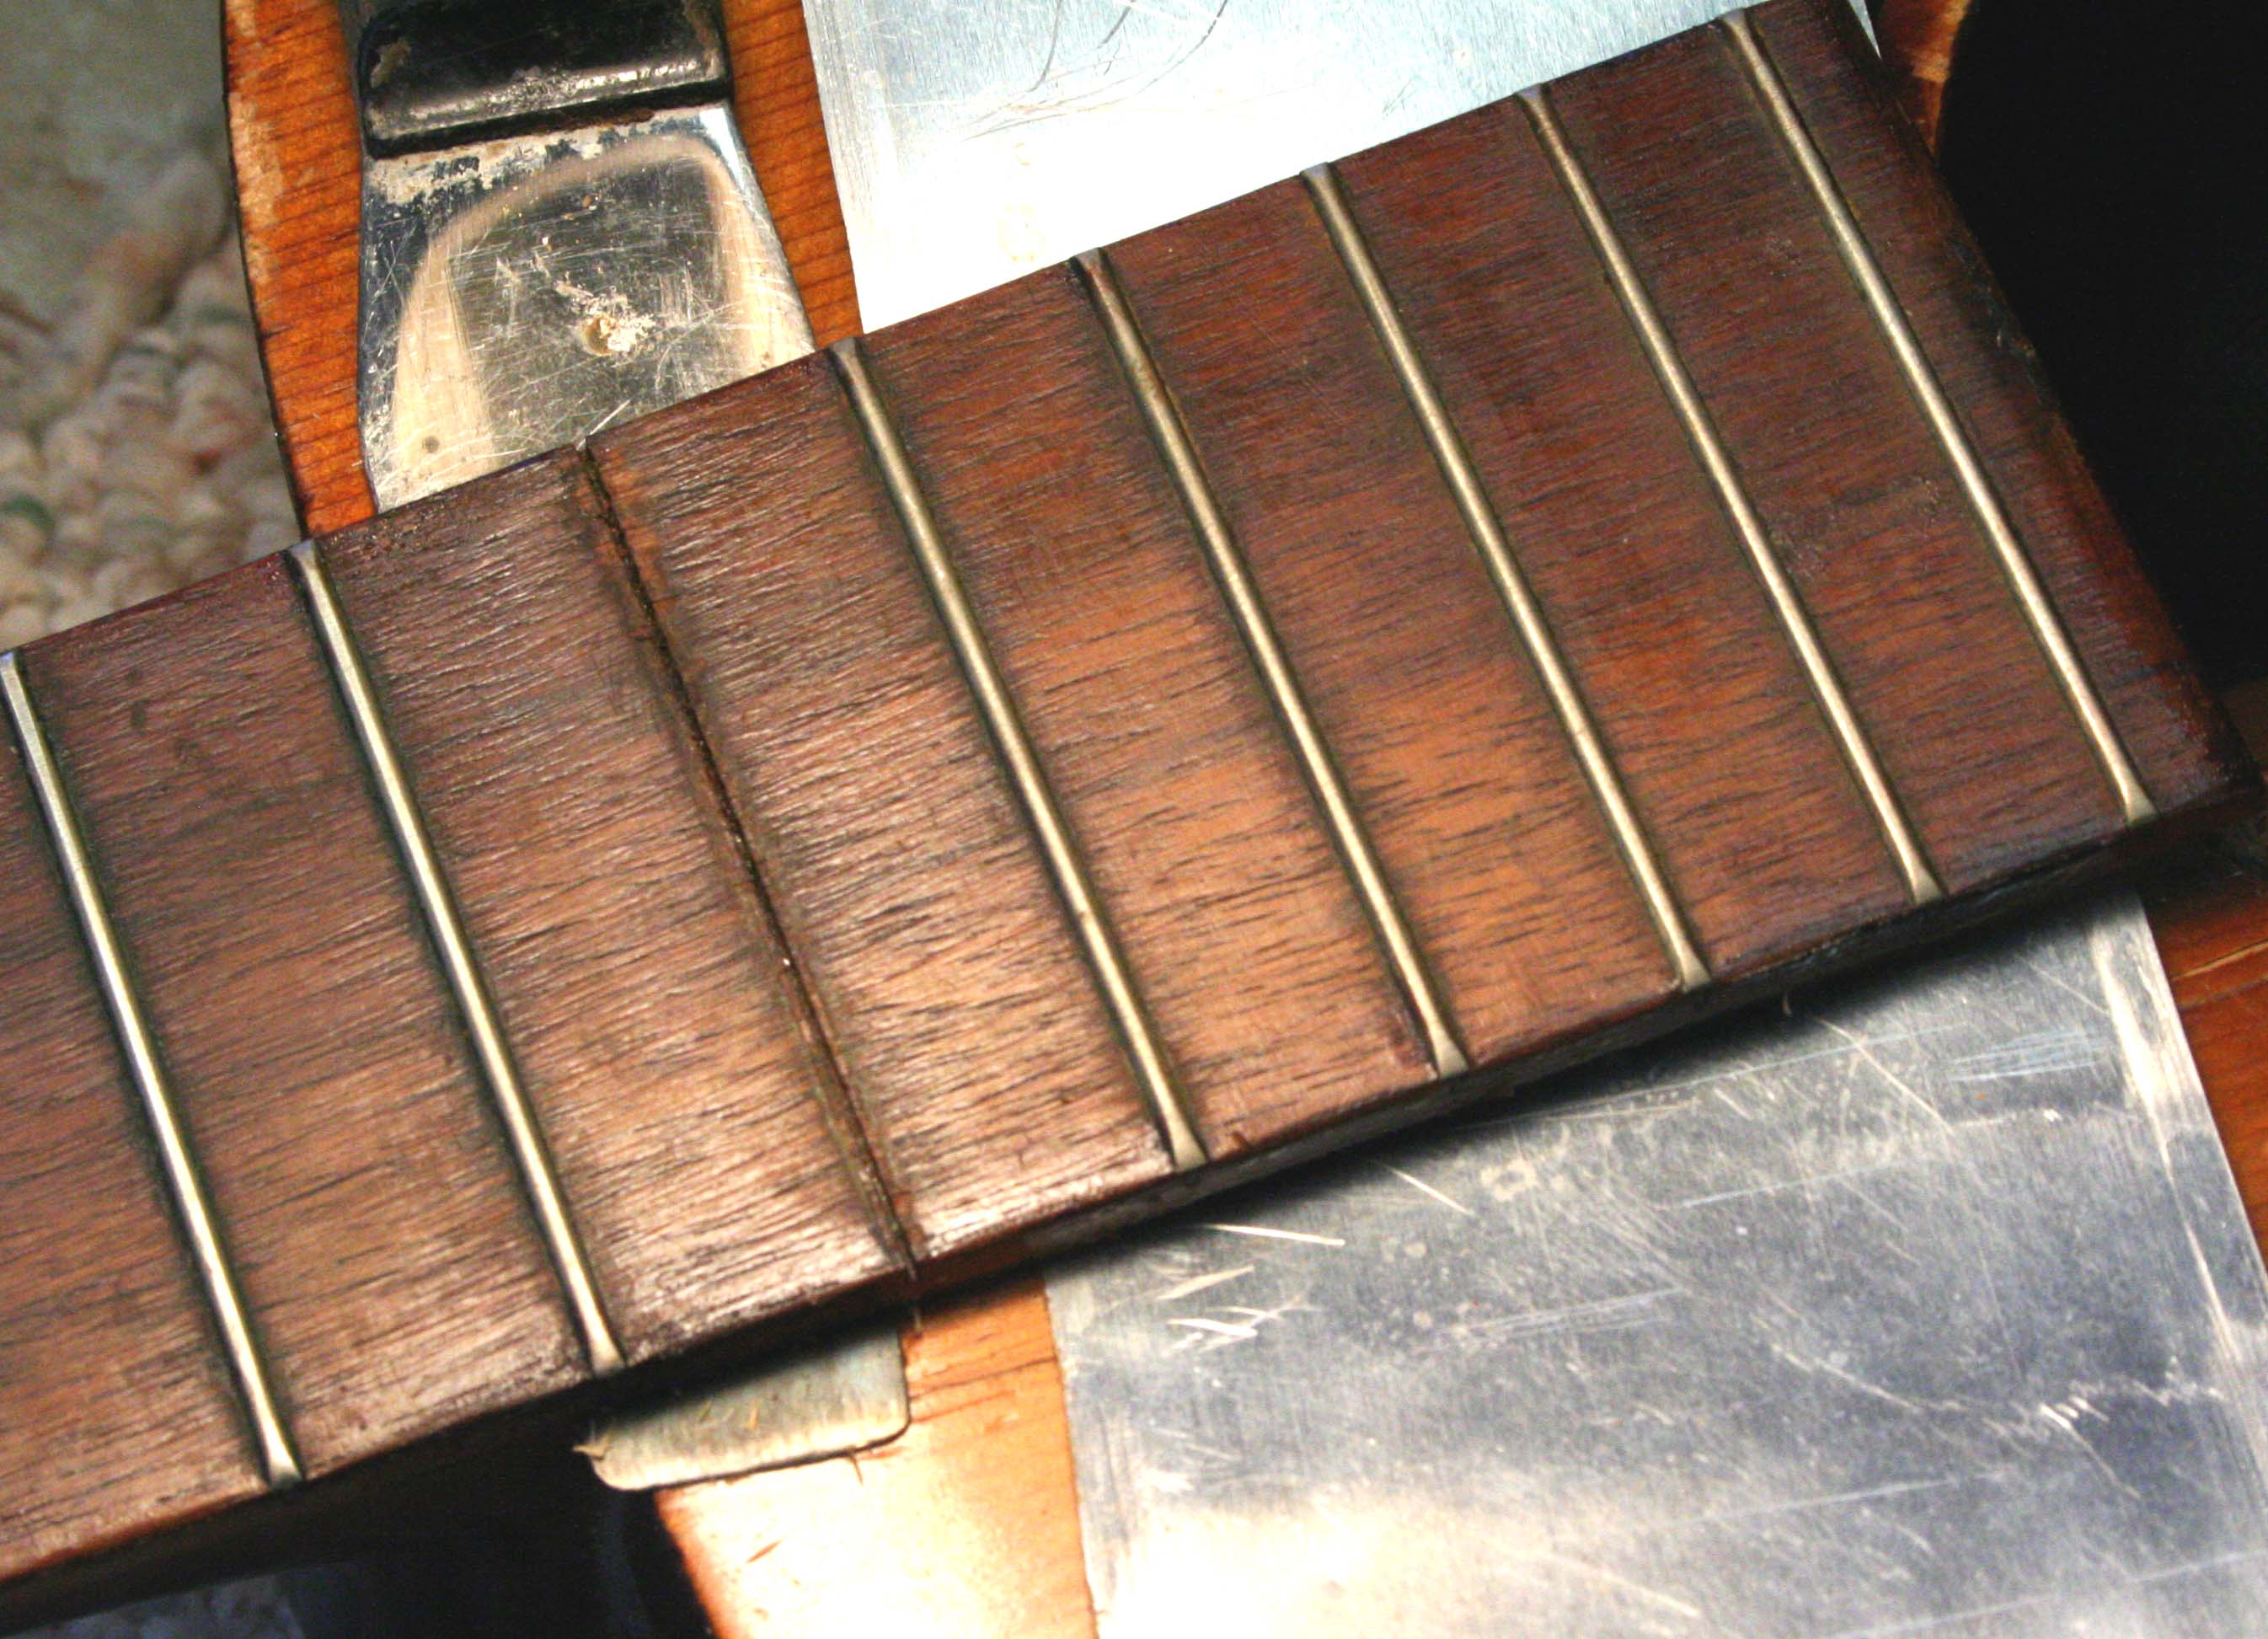
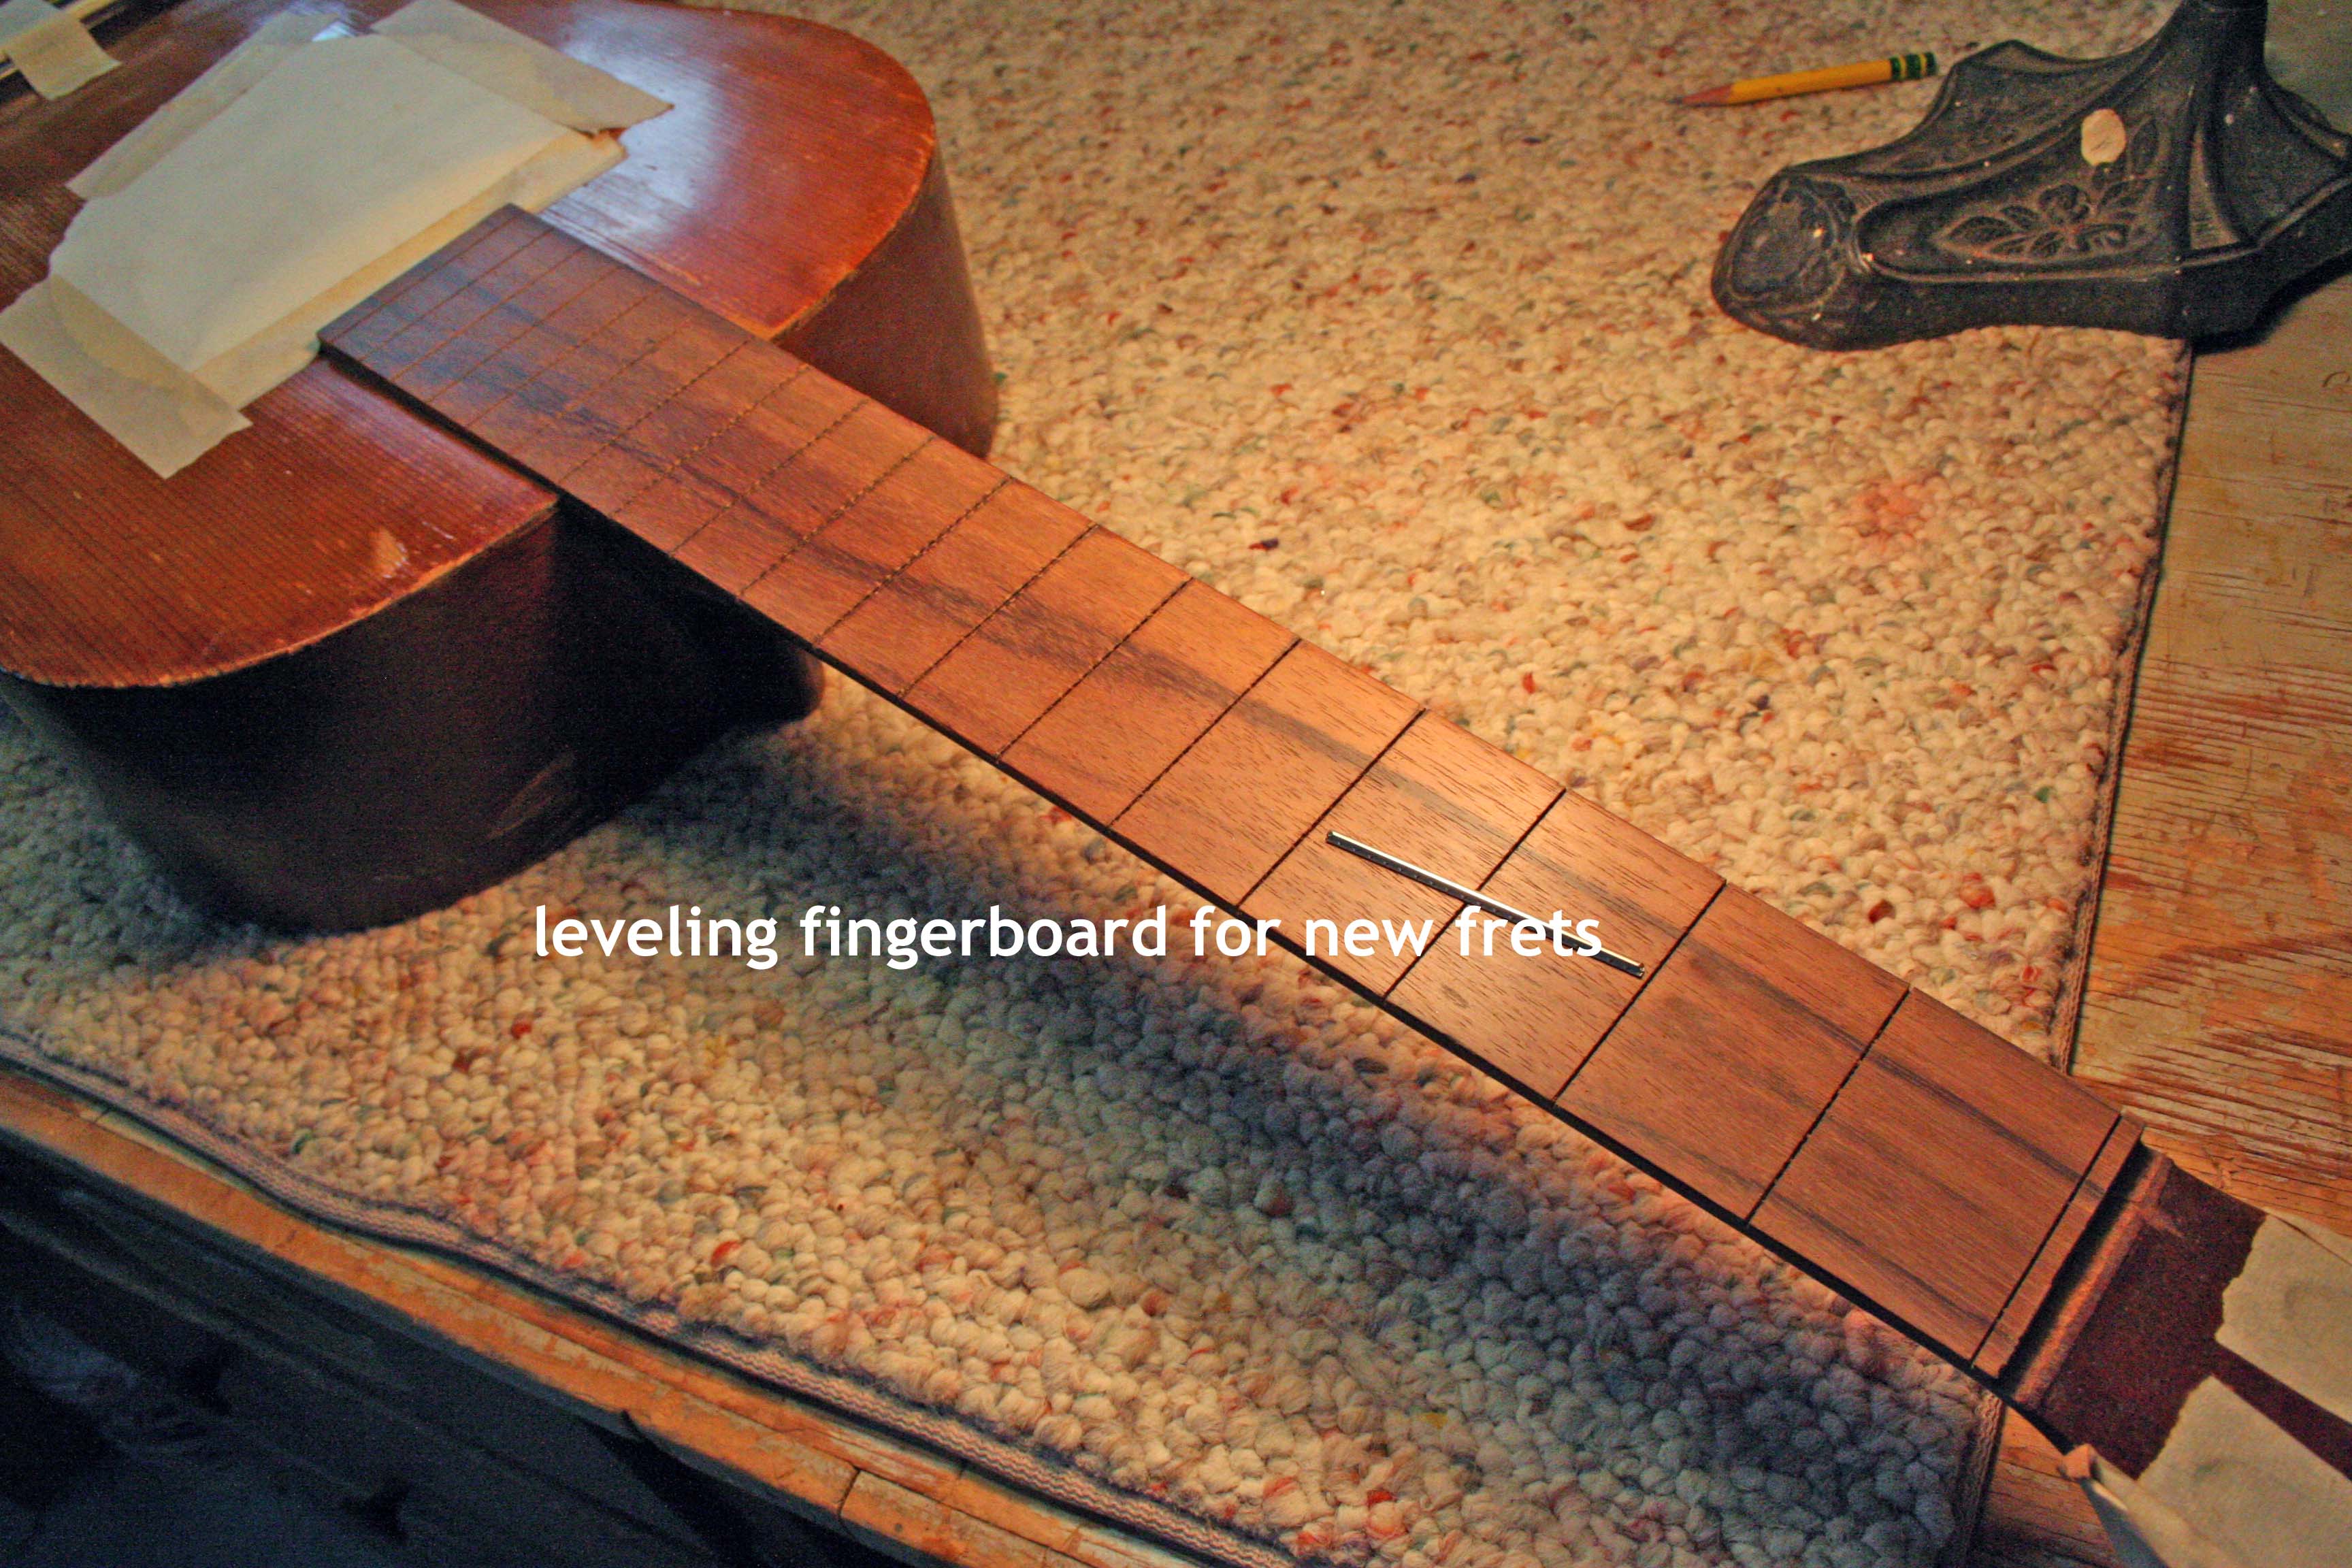
The slots were recut and new frets put in.  This board, being a nylon string instrument, had no radius.  I glue the frets with Titebond as they go in, and I glue the fret ends with cyanoacrylic (Krazy) glue after they are trimmed.  They finished fine, and it plays fine now.
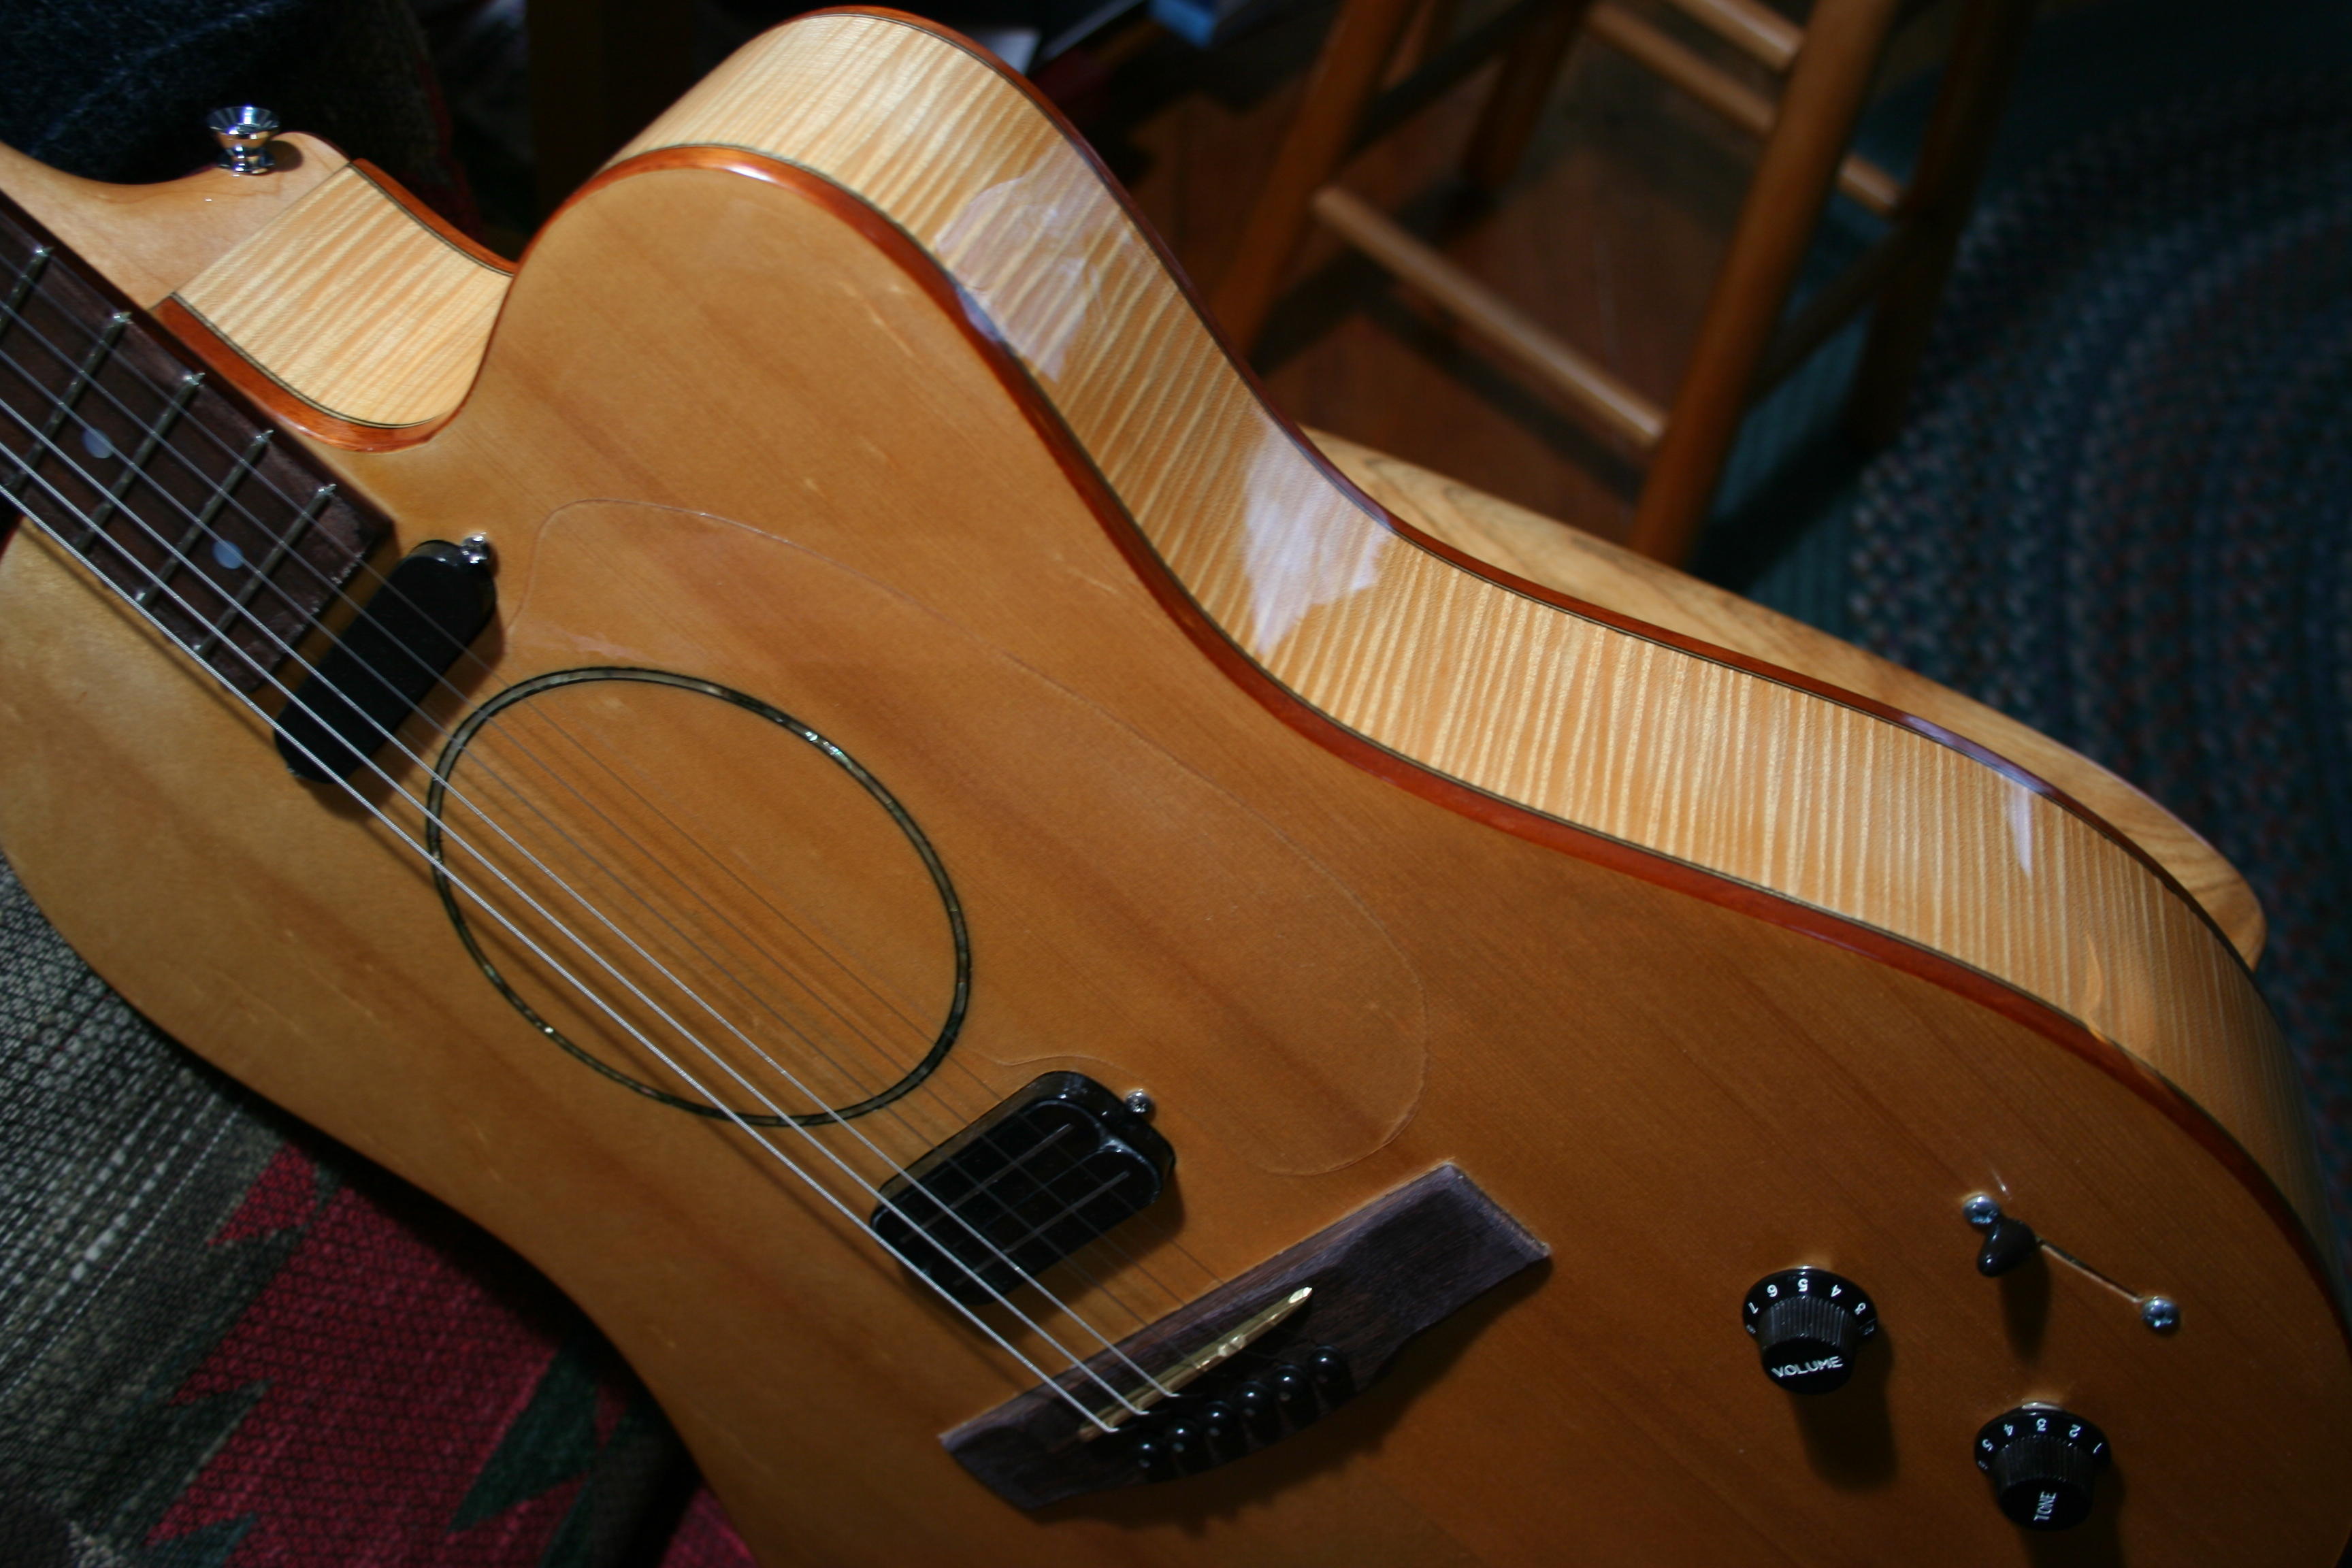
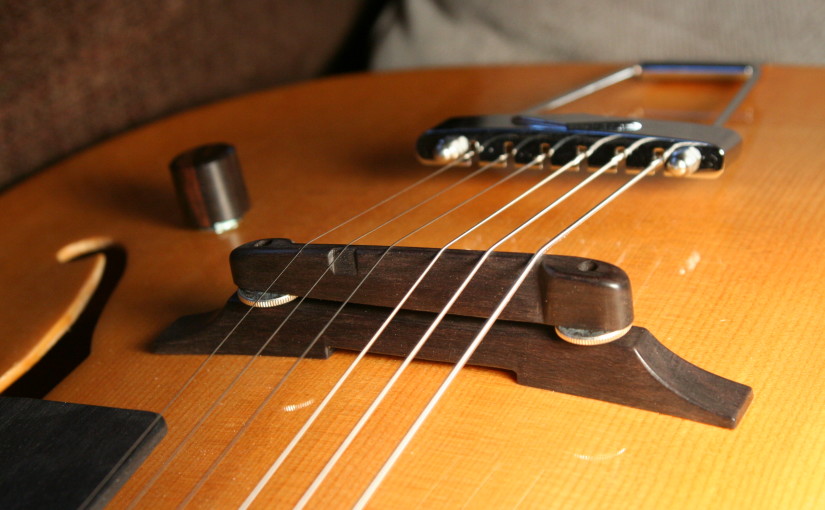
IMG_7164

Adding a Trail Camera video to a WordPress Blog


Deer bedding down.

My Bushnell Trail camera produces video in AVI format which neither Quicktime nor Windows Media Player on my Win XP machine can read.   STOP RIGHT THERE.  If I were to do it over, I would not use this camera for exactly the above reason.  However, it was a gift and I’m going to use it.

Just to see the videos I need another player.  VLC from VideoLan is about the only one that works, is free, and is not loaded with malware.

After trying many different add-ons to WordPress and finding none acceptable, I went with Youtube as the web hosting environment, and insert the embed code into the  blog (must edit in ‘Text’ mode), using the Youtube option to suppress ‘suggested’ videos.

The AVI format created by the camera can be uploaded to Youtube as-is.  However, if I want to edit in any fashion, cut, merge, etc I have to get the video into a format that Windows can read.   This means getting a video converter, and finding one that worked on my Win XP machine was almost impossible.  There are many advertised, most are junk – see this link.  I didn’t learn about the situation until I had purchased a license and found the website PavTube infected with malware, and ‘support’ non-existent.

I ended up with two converters : VLC and Handbrake.  I want to make the videos playable in Windows and Quicktime (Apple).  Neither of the converters works for both.  Quicktime needs a specific version of MP4.  While VLC can output an MP4 ‘container’, it is not playable by Quicktime.  Handbrake can only output 2 formats, but MP4, playable by Quicktime, is one of them.  I use VLC to create ASF output using the DIV3 video and MP3 audio which can be read by Windows Media Player and Windows Movie Maker.

Movie Maker, the XP version I have, is very quirky.  I can combine the ASF clips created by VLC and create a movie from them predictably, but if I want to do any editing I have to first make a movie from the ASF clips which converts everthing into WMV format, and then I can edit in Movie Maker without it freezing up.

Several of my first attempts dead-ended.

There are many suggestions about adding ‘codecs’ (code/decode tables) so players like Quicktime could read files they weren’t designed to read.  This didn’t work and introduced a whole new realm of possibilities like disabling my base players altogether.

I assumed that WordPress incorporated some robust video player, and started testing different plugins.  This was a waste of time.  None of the twenty or so players I tried performed consistently or as advertised.  I then gave the base WordPress player mediaelement.js a try.  It also failed to behave  predictably.  Videos don’t play at all in IE8, but loop in preload.  The preload parameter is ignored in Firefox.  Two videos in the same blog behaved differently even with the same setup parameters.

Different browsers use different video standards, as different operating systems do likewise.  Video for Apple is different from video for Window 8 is different from video for your iPhone.  Properly hosting video on the web means storing it in multiple formats, and a widely used player like Youtube takes all that into consideration and provides it for you transparently.  If you use a self-hosting approach, you will end up being the one to do the multiple encodings and formatting, and it gets quickly more involved than expected.


Gibson Acoustic Neck Reset – Disassembly

This Gibson nylon string was brought to me in need of serious repair.  The angle of the fingerboard relative to the bridge was off by almost 3/8″, and most of the braces were loose.  The top was starting to cave in because of the loose braces, and the action so high as to make it unplayable.  It is also a cosmetic wreck, and not a high-end guitar although it, like any guitar regardless of finish, can sound good.  It has a nice Fishman pickup in it, a plus.  I consider neck resets risky, but there wasn’t much to lose if this went awry, and everything to gain.

IMG_7144
Loose brace ends causing top to sag

A quick look inside confirmed the loose braces – these would get re-glued after doing the neck.

First I pop the first body fret off so I can drill into the dovetail joint to insert the steam needle.   IMG_7146Then, loosen the  fingerboard overhang with heat applied to the fingerboard and a heated knife worked slowly between the top and fingerboard.    IMG_7147Then, after drilling two holes through the slot of the removed fret, I put the body in a jig that gives leverage pushing up on the neck heel and inject steam into the dovetail joint.  IMG_7150It is never certain that the holes drilled through the fingerboard will hit the cavity between the neck and the neck block, but this one was spot-on.  It takes about 15 minutes of steaming to soften the glue, then the neck pops off.  IMG_7151This one came off kind of messy – the glue on the upper body brace had failed and part of the top came with the fingerboard extension.  IMG_7152The pieces were easily recovered, however, and glued back in after fixing the looseness of the body cross brace.  IMG_7153It is now a relatively easy job to reset the neck angle and put it back together.  Luckily, cosmetics are not a big issue.

Winterizing a Seasonal-Building Toilet

Today was a different sort of job – as caretaker of a mountain summer cabin, I make sure the pipes don’t freeze come winter time.  There’s just a few steps in getting the system ready for freezing temperatures.  Draining down the water lines is one of them.  This is easy if the system was designed with pitched supply pipes ending at valves.  The drains are also handled easily, as long as the traps have drain plugs.  After draining the water from the traps, potable-water antifreeze (often called RV antifreeze) is poured back in the drain, and they’re all set.  Toilets are little different.

Toilets have no drain, and water left in the siphon section will dilute antifreeze to the point where it will freeze.  The RV antifreeze must be used without dilution to provide adequate protection.  The last thing you want is to return to the cabin in the spring and find a ruptured toilet.  When I checked my cabin today in 10 degree weather, the antifreeze in the toilet had turned to a semi-solid slush, showing that I had failed to completely remove the water from the trap before adding the antifreeze.

First, you might want to clean the toilet – good time to do it, if it never gets done any other time of year.  Next, shut off the water supply to the tank and flush the toilet, then take the cover off the tank and hold the flapper valve open and get as much water out of the bottom of the tank as possible.  End up by taking a sponge and soaking up any water left in the bottom of the tank.  The tank should be dry.  Now, take a plunger and plunge the bowl to force-flush as much water down the drain as possible.  Repeat this until plunging doesn’t do anything more.  The water remaining in the bowl must be soaked up with a sponge.  This is where you will be glad you cleaned it first, and have some disposable gloves on hand.  Soak up the remaining water from the bottom of the bowl.  This will empty the trap.  Now, add RV antifreeze – add enough to get one flush out of the toilet, then add to bring it to normal level.  When you are done, put a sign on the seat ‘Do Not Use’.  See you in the Spring.

Guitar / Uke Finishing Schedule

My finishing schedule has been adapted through many attempts with a variety of finishes, and is suited to hand-applied finishes, and gives predictable results.  This is more difficult than it sounds.  Elsewhere I may list the combinations that didn’t work, and why – for now, here is what I do.

Start by sanding everything to at least 400 grit, starting with 80 and going through 120, 220, up to 400.  Some parts come off the drum sander which runs a 60-grit belt, and extra thickness, a few thousandths, must be left on the material to allow for sanding back through the deep scratches from the drum.  I use a cabinet scraper interchangeably with sanding to level and smooth surfaces.

Wipe down the surfaces to be finished with a tack cloth, and apply a coat of de-waxed shellac.  Shellac that is pre-mixed and sold in cans usually contains wax which makes it unsuitable as an undercoat for oil or other finishes.  If you use pre-mixed shellac, it must be identified as ‘de-waxed’ – this is usually only found in pre-mixed shellac marketed as a ‘sealer’.  Shellac is available in dry form as flakes, and these are also both ‘waxed’ and ‘de-waxed’.  If you mix your own shellac from flakes, use de-waxed flakes and dissolve in solvent alcohol at the rate of about 1 pound of flakes to 1 gallon of solvent alcohol, making a ‘1-pound cut’.  This is a pretty fluid consistency suited to sealing.  I use disposable foam brushes and apply the shellac to cover without runs.

The purpose of the shellac is to seal the wood, raise the grain for the final sanding, and provide a substrate that lets my oil-based top coats dry on oily woods.  The  oils in some woods used in guitar construction, like rosewood and cocobolo, will prevent oil finishes from curing, indefinitely.  A sealer coat of shellac overcomes this problem.

The shellac is dry in a very short time.  After allowing an hour or so, I apply a pore filler to any woods that are open-pored.  Those woods include mahoganies, walnut, koa, rosewoods; you don’t fill woods like maple, cherry, spruce.  I use a microballoon water-based filler (from LMI) that can be tinted with artist’s acrylic colors.  I smear the filler on with my fingers, wipe most of it off by rubbing a cloth across the grain, and let it dry.  Again, this dries fairly quickly.  Then sand it all off with 400 grit except for what remains in the pores.  This step also levels the grain raised by the shellac base coat.

Now the top coats begin.  These number between 3 and 7, depending on how things look.  The object is to build a layer of finish that is thick enough to be sanded level for final polishing out.  I use a marine grade spar varnish.  This varnish is on the soft-side as varnishes go, but applies smoothly by brush and does a nice job of enhancing the natural color of the wood.  The varnish can be tinted with oil-soluble dyes, and small amounts of dye added to each coat will build up a distinctive color cast over several layers.  The dye, when I use one, is first dissolved in paint thinner, and added to the finish in small amounts.  The finish as it comes out of the can is too thick to flow well – it is sold that way to meet VOC compliance – and must be thinned with thinner or turpentine.  I thin approximately 20% – or, one teaspoon of thinner per 5 teaspoons of varnish.  Eight teaspoons of varnish is enough for one coat on a guitar, again, applied with a foam brush.  I use props inserted though the soundhole to support the instrument as it dries.

The varnish takes longer to dry – typically it is dry-to-touch in about 4-6 hours, and hard enough to sand in a day.  On the safe side, I wait at least 2 days between coats before sanding.  This means putting on 7 coats takes 2 weeks.  Sand minimally between coats with 400 grit, and remove any runs.  Repeat until the finish is thick enough.

Now, wait at least 2 weeks.  The longer you wait, the easier the buffing out will be, and the better the gloss.  Sand everything back with 400 grit to level the surface.  Move to 600 grit and sand some more.  Move to 1000 and repeat.  All these final sanding steps are done using water with the sandpaper as a lubricant.  Let the instrument set a couple days.

Switch to autobody buffing compounds.  Go over everything with a ‘medium-cut cleaner’, applied by hand using a soft cloth.  Repeat with a ‘fine-cut cleaner’.   Then go to a buffing wheel with a medium fine polishing wax, and it is done.

IMG_0001
Crossfire #3 – acoustic/electric dual humbucker


Basic Guitar Setup

Guitar setup is intended to maximize playability and assure accurate intonation.  These are the steps to take to determine what to adjust, and whether there are underlying structural problems that must be addressed before correct setup can be accomplished.

Maximum playability means the lowest string action possible without unnecessary fret buzz.  Start by checking neck relief.  Fret any string at the first and fourteenth fret, and check in the middle to see how much space there is between the string and the frets, say, around the seventh fret.  There should be a small amount of space – about 1/32″ or so.  This space is necessary to prevent buzz because the string moves both side-to-side and up-and-down when it is struck.  Assuming the neck has an adjustable truss rod, adjust the truss rod to give the correct relief.

Check a couple strings before adjusting the truss rod.  Both E’s is a good start.  Care must be taken in all steps of setup, especially with truss rod adjustment.  Generally, you can assume that turning the adjustment nut clockwise will tighten the truss rod, adding pressure to create back-bow, reducing neck relief.  This is not always the case, so proceed slowly.  Make sure your wrench/allen key or other tool fits the rod nut tightly.  Backing off a truss rod nut, turning counter-clockwise, is usually easier than tightening the rod.  When backing off a rod, you can rely on string tension to bring the neck up, adding relief.  When tightening the rod to reduce excess relief, it is best to use a clamp and block arrangement to bend the neck and then tighten the rod to hold the new position rather than relying on the rod alone to bring the neck back.  Place a small block on the first and 14th frets, place a board across on top of the blocks and use a padded C-clamp to push the back of the neck upwards by springing the neck up between the two blocks.  Go in very small increments and when you see the neck starting to bend, stop, tighten the truss rod a little, and take off the clamp.  Check the relief again.  If the truss rod nut ends up in a ‘neutral’ position, turn it one way or another to put it under a little tension, otherwise it may rattle.

Check string slots at the nut.  Each string, when fretted at the fifth fret, should show a very small amount of space over the first fret.  Slots that are too low will give string buzz on an open string; slots that are too high will make for painful fretting near the nut.  Slots that are too low can be filled in with powdered bone and Krazy glue, and re-slotted.  Get a piece of cattle bone, sand it to make dust and put some dust in the low slot.  Add a drop of Krazy glue and let it set.  File the slot.  Slots that are too high can be filed.  You need a couple nut files to do this, but not a whole array of them.  Two files, one of about 0.013″ and one of about 0.028″ should work – use them side-to-side as needed to make slots wider than their designated size.

Set the action by checking the string height above the twelfth fret.  The open string on the bass side should show around 0.110″ (a little less than 1/8″) space between the string and the 12th fret, and the treble should show a little less – say around 0.090″.  Corrections are made by lowering or raising the saddle.  Raise of lower the saddle by twice the amount that you want to correct at the twelfth fret.  Bone saddles are adjusted by filing to lower, or making a new saddle if they need raising.

Check the intonation.  A string produces a certain pitch at any given length and tension.  Holding that same tension, cutting the length of the string in half produces the octave.    The twelfth fret is theoretically at the halfway point between the nut and the saddle, and therefore produces the octave of the open string.  However, when the string is fretted along its length it is stretched a small amount, and this increases the tension, raising the pitch a small amount.  Intonation is about putting the saddle in the correct position such that each string, when fretted at the 12th fret, produces the octave.  In practice, the distance from the nut to the saddle will be slightly longer than the stated scale length, because of compensation for stretch.   Bass strings are more affected by string stretching than trebles, and steel strings are much more affected than nylon strings.  Guitars with moveable bridges or individually adjustable saddles are much easier to intonate than flat tops with bone saddles set in wooden bridges.  Using an accurate tuner, check each string, and move the saddle so the open string and the octave are both in tune.  On flat tops, adjustments are limited to the width of the saddle, and are made by filing either the front or the back of the saddle for each string as needed.  Because bass strings are more affect by stretching than trebles, you see the characteristic slanted saddle position.

At this point the guitar should play in tune, smoothly and without buzz.  If buzz is apparent, the frets may need to be leveled.  Loose frets that don’t stay down, and heavily worn frets, will create buzz problems for the neighboring frets.  This and other problems will be addressed in a future blog.

Tenor Uke

This tenor uke is being made out of Vermont black walnut for the back and sides, western red cedar for the top with sitka spruce braces, and spanish cedar neck, with koa headstock veneer and bubinga finderboard and bridge.  Black walnut bends very nicely in addition to its other nice qualities.

Side bending is done using a heated pipe, in this case a section of small sailboat mast.  Woods bends by compression and not stretching, so it is important when bending to apply steady gentle pressure as the wood heats up, while supporting the outside of the bend.  The picture below shows the torch heating the pipe, one side bent and in the body mold and the other side starting to be bent, checking the bend at the waist.  Water from a spray bottle helps the heat transfer.IMG_7119After the sides are bent, they are placed in the mold to set.  IMG_7121

The neck and tail blocks get glued in, the neck block slotted for the tenon of the neck.  The tailblock is spruce, grain running parallel to the grain of the sides.  The kerfed lining is installed next, while the top and back are made up.

Dimensions of the top and back finish out around 0.075″, which is just a little over 1/16″ thick.  Not much!  The top soundhole is cut out with a Dremel tool rotating around a pin centered in the  soundhole, and the inside of the cut is lined with a piece of black fiber purfling to protect the end grain.  The top bracing somewhat follows typical guitar X-bracing – but simpler. IMG_4774

The back is glued on first, with the sides in the body mold, then the top is glued on and everything given a preliminary sanding.

The neck blank is made up out of 3 pieces of flatsawn cedar such that the result places the grain perpendicular to the pull of the strings.   After gluing on the headstock veneer, the neck is rough carved and the tenon of the neck fitted to the body for the correct angle – This angle will place a line which follows the top of the fretted fingerboard such that it passes just over the top of the bridge (not the saddle).  Here is a view of the back of the uke andIMG_7143 next is a picture of the top.  Both pictures show the beginning of the fingerboard, which is made out of African bubinga.  The board will be tapered in width from the nut to the body (taper not cut yet), and is tapered in thickness from the nut to the body to give the required angle described above.  Here is a top view, showing the neck tenon and top.  Stay tuned for updates.  IMG_7142

Mogami 2319 and Switchcraft 228

Luke is making up a couple pedal boards – one, a road board for Guster touring, and a second for studio work.  He wanted high-quality patch cables for the short jumps between pedals – eliminate troubleshooting intermittent outs on ten-pedal boards.  He bought Mogami 2319 cable and the pancake head all-metal Switchcraft 228 jacks, and I offered to assemble them – 12 short patch cables in the case of the studio board.  The 228 jacks have no lugs for the ground wire, and many people solder the ground directly to the jack body.  The Mogami looked like regular patch cord wire – braided ground shield with center insulated conductor.  The only thing I didn’t like was the Mogami measures less than the 0.210″ minimum diameter needed by the 228 to effectively hold the cable in the clamp – we added a layer of heat-shrink tubing at the clamp position to take care of that.  I confidently assembled all 12 cables, soldering the grounds to the body and the hot to the jack tip.  It was a complete surprise to find every one had either a dead short, or a weirdly partial short when I finished.

What I found out is the Mogami uses a pvc conductive shield under the braided ground wire, and over the hot wire insulator – the pvc shield can get shorted out to the hot by solder at the hot wire connection creating the partial short, which has the same effect as a volume pot on a low setting.  And, the amount of heat needed to solder a ground to the jack body can very easily damage the insulator around the center hot wire, creating a dead short.

IMG_7138

IMG_7134

Had I checked the supplier website, Redco Audio, I would have seen the note that the pvc shield needs to be trimmed back.  The solution was to trim back the pvc shield on the hot before soldering, and switch to a mechanical ground instead of a soldered ground.  Still using the heat-shrink tubing to increase cable size for the clamp, the ground braid is folded back over the cable, half ‘on top’ and half ‘on the bottom’, and the hot is soldered to the hot lug of the jack – being careful to tin the jack lug before attempting to solder the hot wire.  The finished connection looks like – IMG_7139